Discover the
Modern
WordPress with WordVell
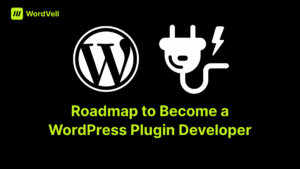
The 10-Step Roadmap to Become a WordPress Plugin Developer
Can you really become a WordPress plugin developer by watching random YouTube tutorials?
Most aspiring developers at the start of their career, even from our team, try exactly that and end up overwhelmed, stuck at “Hello World,” or afraid to build real plugins.
In reality, WordPress plugin development isn’t hard, but it does require the right learning order.
This 10-step roadmap fixes that.
In this article, you’ll learn the exact sequence used by successful plugin developers, starting from PHP and MySQL fundamentals, moving through WordPress APIs, security, testing, and ending with monetization and income & career opportunities.
Every step builds on the previous one, so nothing feels overwhelming or disconnected.
If your goal is to build plugins people trust, use, and pay for, this guide will give you a clear path from beginner to professional WordPress plugin developer.
Ready? Let’s start with the first step: mastering the prerequisites.
Step #1: Master the Prerequisites Before You Touch Plugins
Every successful WordPress plugin developer has one thing in common: a rock-solid foundation.
Think of it like building a skyscraper. Without a strong base, everything collapses.
Plugin development is no different than this.
So, here are some basic skills that you should master
Learn PHP and MySQL
PHP and MySQL are the most fundamental skills for WordPress.
Because WordPress is 80% PHP and MySQL under the hood (source: W3Techs).
That means if you don’t know PHP, you can’t proceed in a WordPress environment.
PHP performs all the functionalities of WordPress. Whereas MySQL stores and manages data.
Want to build a plugin?
You’ll definitely need PHP and MySQL to complete your tasks. Without these, you can’t proceed an inch.
Learning Resources: Here are W3Schools Tutorials to learn PHP and MySQL.
Understand HTML, CSS, and JavaScript
Plugins aren’t just about logic, but they are about solving user problems and enhancing user experience.
Over 53% of users abandon a site if it feels clunky or confusing (Google UX Report).
That’s where HTML, CSS, and JavaScript step in.
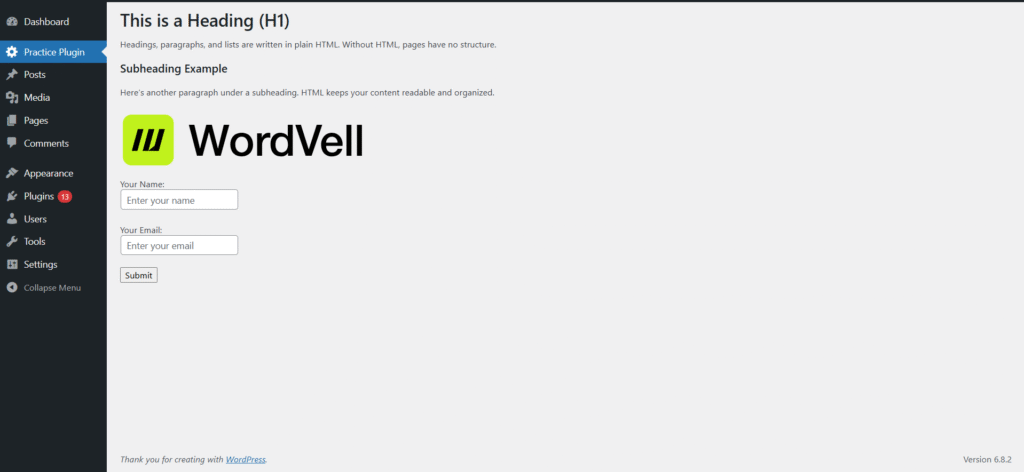
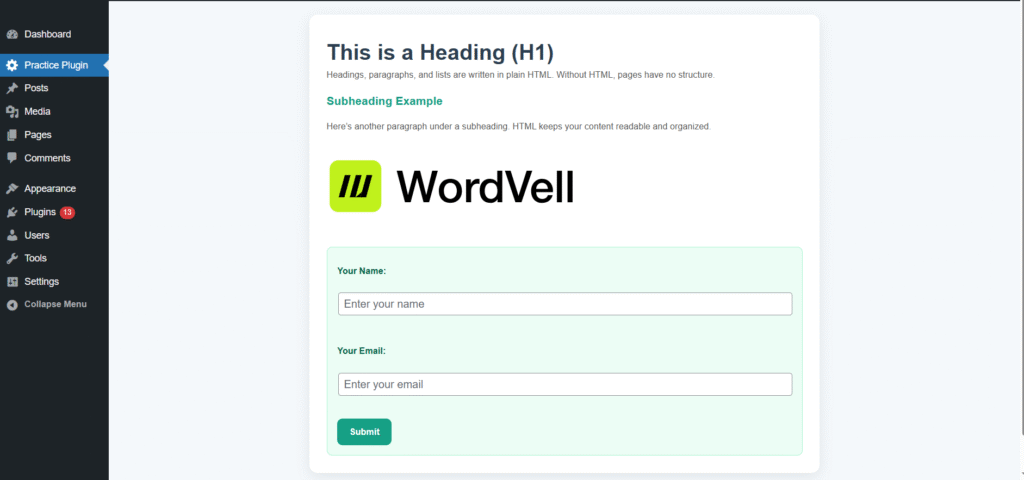
HTML helps you create a structure of web pages by adding vital components like Headings, paragraphs, forms, images, tables, and much more. Without this, you can’t create webpages.
Here, we created a Plugin page using HTML elements. Without HTML, this page cannot be created.
After HTML, the most important role is played by CSS. This is used to design web pages.
Designing is really important because it improves user experience and readability. Otherwise, no user will like to see your ugly web pages.
We improve the above plugin page with CSS.
After developing the interactive static web pages with HTML and CSS, the role of JavaScript emerges.
JavaScript adds dynamic abilities to web pages and can perform a wide range of tasks in this regard, like
- Form validation and submission without page reload.
- Show dynamic content with infinite scroll or live search.
- Build interactive menus, sliders, and smooth animations.
- Trigger features based on user events like clicks, hovers, or key presses.
- Dynamically edit HTML and CSS to change how a page looks and works.
These are highly important to develop your plugins. Even if you know PHP and MySQL, you will need them to complete the functionalities of your plugin.
Learning Resources: Follow W3Schools Tutorials to Learn HTML, CSS & JavaScript.
Get Familiar with the WordPress Ecosystem
Finally, Learn WordPress itself.
There are over 43% of the web running on WordPress (W3Techs).
So, knowing its dashboard and file structure, and the working of themes and plugins is like knowing the map before travelling to a new place.
Once you understand how themes and plugins interact, building your own becomes your nature.
Learning Resources:
- We recommend you to follow this Official WordPress Course to learn the WordPress Ecosystem as a beginner.
- You can also watch this WordPress tutorial by Darrel Wilson
But if you already know the WordPress basic usage, then move to the next steps.
Pro Tip: Master these prerequisites, and the rest of the roadmap will feel more comfortable to follow.
Step #2: Grasp the Core Fundamentals of WordPress Plugins
This is where things get real.
You’re not just “adding code.” You’re learning to develop the core component of WordPress.
But before moving on, let’s understand the plugins first…
A plugin is simply a package of code that plugs into WordPress. It adds additional functionality or customizes the current functionality of WordPress.
Understand Plugin Basics
Every plugin starts with one main file.
You can create this main file directly inside the plugins directory, or you can create your plugin folder (directory) first inside the plugins folder and then place the main file in your directory.
Option 1: Place main file directly in plugins folder
---------------------------------------------------
wp-content/
└── plugins/
    └── my-first-plugin.php   ← Main plugin file


Option 2: Create a plugin folder and put the main file inside
-------------------------------------------------------------
wp-content/
└── plugins/
    └── my-first-plugin/      ← Plugin directory
        └── my-first-plugin.php   ← Main plugin file
It is good practice to create a separate directory for your plugin if your plugin consists of more than one file.
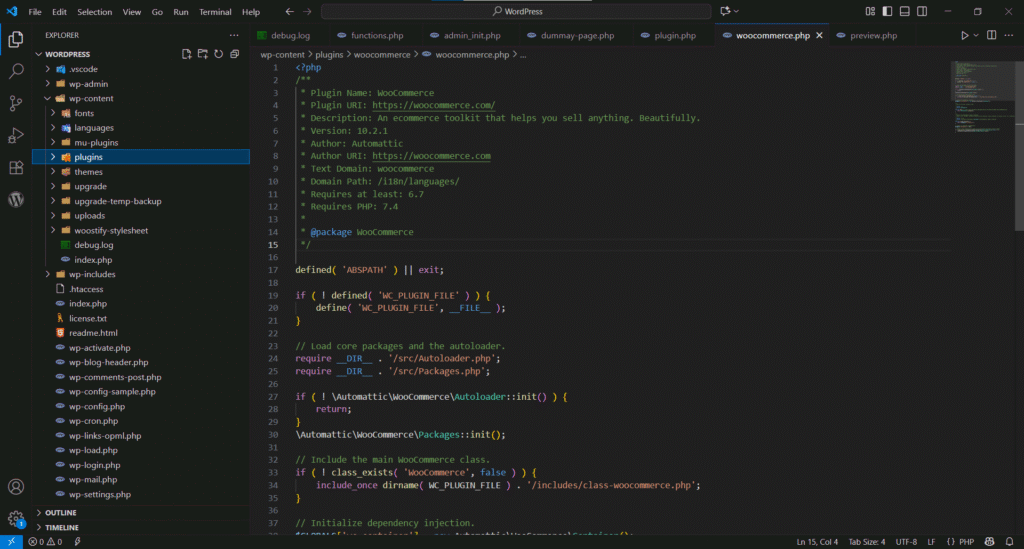
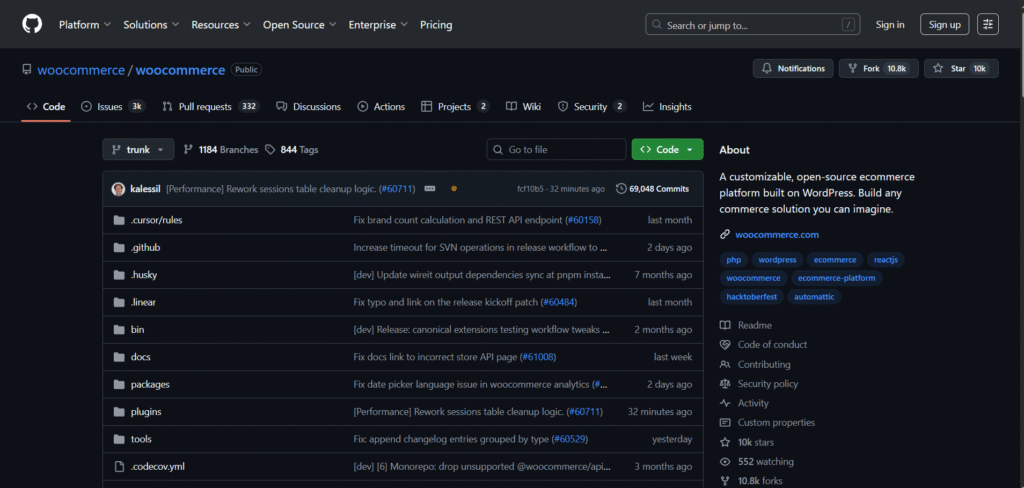
This main file consists of essential elements like the plugin header. The plugin header highlights the plugin name, version, author, and multiple other things.
Here’s the plugin header of the WooCommerce Plugin:
<?php
/**
 * Plugin Name: WooCommerce
 * Plugin URI: https://woocommerce.com/
 * Description: An ecommerce toolkit that helps you sell anything. Beautifully.
 * Version: 10.2.1
 * Author: Automattic
 * Author URI: https://woocommerce.com
 * Text Domain: woocommerce
 * Domain Path: /i18n/languages/
 * Requires at least: 6.7
 * Requires PHP: 7.4
 *
 * @package WooCommerce
 */
It acts as the entry point of your plugin. From there, you will start writing functions that WordPress can recognize and execute.
Learn the Magic of WordPress Hooks
The WordPress Hooks are the real magic that allows you to extend WordPress beyond its core.
There are two types of hooks:
- Actions that let you inject code at specific events during the WordPress lifecycle (e.g., when a post is saved).
// Send email when post will be saved
add_action( 'save_post', 'notify_on_publish' );

function notify_on_publish( $post_id ) {
	wp_mail( 'admin@example.com', 'New Post Published', 'Post ID: ' . $post_id );
}- Filters that let you modify data before it shows up (e.g., changing post titles).
// It will change the Post title by adding the emoji at start
add_filter( 'the_title', 'edit_post_title' );

function edit_post_title ( $title ) {
	return '👉 ' . $title;
};
WordPress core itself is built on hooks. That’s why Experts say:
“If you don’t understand hooks, you don’t understand WordPress.”
So, without understanding the hooks and their application, you cannot even move a bit in WordPress development.
Learning Resource: Follow the WordPress Plugin Handbook to Learn about WordPress hooks (actions and filters).
Admin Menus, Shortcodes & Debugging
Once you have understood the hooks, you’ll need to move towards the features that are necessary for your plugin.
First, you need to practice adding admin menus so your plugin has its own pages inside the admin dashboard.
Without admin pages, you can’t show your plugin content, features, or options inside the WordPress admin dashboard.
Learn more about creating admin and sub-menu pages in WordPress
Second, you need to learn Shortcodes, which is also an important concept that allows users to insert functionality directly into posts or pages without repeating the code every time.
Here, we develop some tables to insert into our blog posts using the WP Data Tables Plugin. Where each table has its own unique shortcode.
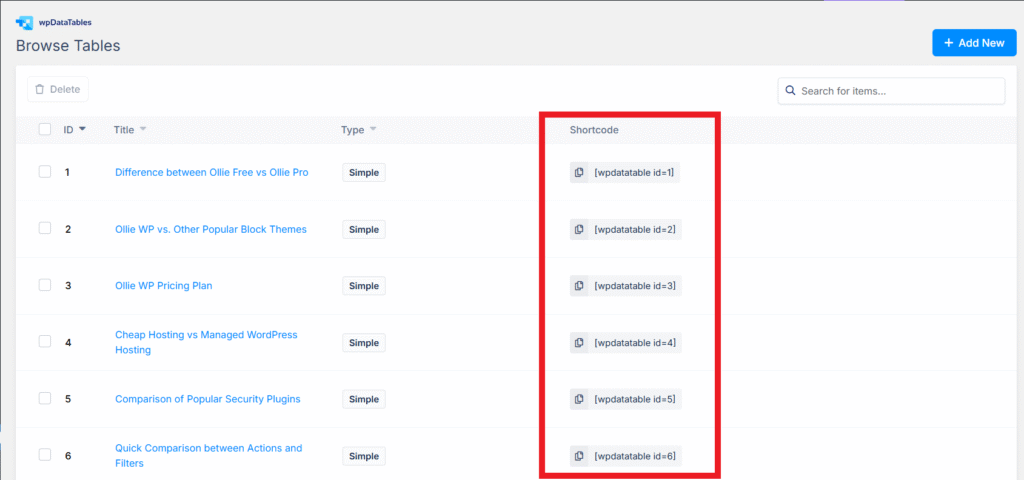
When we place this shortcode in any of our posts or pages, the table will be shown automatically.
Explore more about Shortcodes here.
Where to Learn More
You can learn these concepts from these resources:
- Official & Free: Plugin Developer Handbook.
- Official Course by WordPress: Beginner WordPress Developer
- Paid: Udemy’s WordPress Plugin Development Courses.
Step #3: Set Up Your WordPress Plugin Development Environment
Before writing a single line of code, you need the right environment.
If you skip this, your start will be hindered, and even simple tasks will feel like pushing a car uphill.
Get this right, and plugin development feels smooth, safe, and fun.
Here are a few things that you need to set up to start plugin development:
Install a Local Development Environment
Never develop and test your plugins on a live site. That’s like learning to drive on a highway during rush hour.
Instead, set up WordPress on your local system. You can do this through these tools:
LocalWP is the preferred option because it is beginner-friendly and has an easy installation. Here’s the guide on how to set up WordPress with LocalWP.
XAMPP is a classic, lightweight, cross-platform, but more advanced setup than LocalWP. You can set up using the guide below:
Docker is flexible, powerful, and great for scaling, but it has a complex setup, and it is not required for beginners.
Local environments let you break, rebuild, and experiment without the fear of crashing any live site.
Choose Your Code Editor Wisely
Your editor is your command center. It’s where you’ll spend most of your time.
Visual Studio Code (VS Code) is the go-to choice for many beginners and professionals due to its extensive free extensions, including those for PHP, WordPress snippets, and debugging.
If you prefer something more powerful, PhpStorm is a premium IDE that offers advanced features, including built-in refactoring and deep code analysis.
However, it is paid (Free for Students but not for Commercial Purposes).
Whatever you pick, make sure to enable IntelliSense and linting. It flags errors before they turn into late-night debugging nightmares.
Use Git + GitHub for Version Control.
GitHub is a tool that will work like a time machine for you. It helps you in many ways, like:
- Track changes.
- Roll back mistakes.
- Collaborate with your team.
Here, you can see the GitHub Repository of WooCommerce, where you can track all the previous 69,048 changes (commits) made by the WooCommerce team.
We recommend you set up GitHub in the initial stages, even if you are working alone. But if you are a team and collaborating on the same project, then it is compulsory for you.
Enable Debugging & Error Logging in WordPress
Finally, don’t skip basic debugging and error logging, which most beginners often ignore, and waste hours later chasing invisible bugs.
This debugging and error logging setup at the initial stage of development will help you to diagnose, solve, and prevent errors and bugs.
Find out WP_DEBUG & WP_DEBUG_LOG constants in your wp-config.php and set their value to true like this:
// Enable WP_DEBUG mode
define( 'WP_DEBUG', true );

// Enable Debug logging to the /wp-content/debug.log file
define( 'WP_DEBUG_LOG', true );
This reveals warnings and errors in the debug.log file, which you would have missed otherwise.
Explore more about debugging and error logging in WordPress
Now, you’re officially geared up because your environment and editor are ready, version control is in place, and debugging is switched on.
Now move on to develop your first “Hello World” plugin.
Step #4: Build Your First Simple WordPress Plugin
Your tools are ready.
Your environment is set.
Now it’s time to write your very first plugin.
Don’t worry, it doesn’t need to be fancy. The goal here is simple: learn the building blocks every plugin relies on.
Start with a “Hello World” Plugin
Begin by heading into the wp-content/plugins/ directory in WordPress core.
After this, create a new folder:
/hello-world-pluginInside it, make a file named
/hello-world-plugin.phpAt the top of this file, paste this header:
<?php
/**
 * Plugin Name: Hello World Plugin
 * Description: My first WordPress plugin that prints Hello World.
 * Version: 1.0
 * Author: Your Name
 */

function hw_display_message() {
    echo "Hello World! This is my first plugin 🚀";
}

add_action( 'wp_footer', 'hw_display_message' );
Go to the Plugins Page in the WordPress Admin Dashboard. You will see your plugin there.

Now, activate it in your dashboard. You will see “Hello World! This is my first plugin 🚀” in your website footer.
Boom, your first line of plugin code is live.
Add a Basic Admin Menu Page
Want your plugin to feel more “official”?
Add an admin menu page for your plugin with this code:
function hw_admin_menu() {
add_menu_page(
"Hello World Plugin", // Page title
"Hello World", // Menu title
"manage_options", // Capability
"hello-world", // Slug
"hw_admin_page" // Callback
);
}
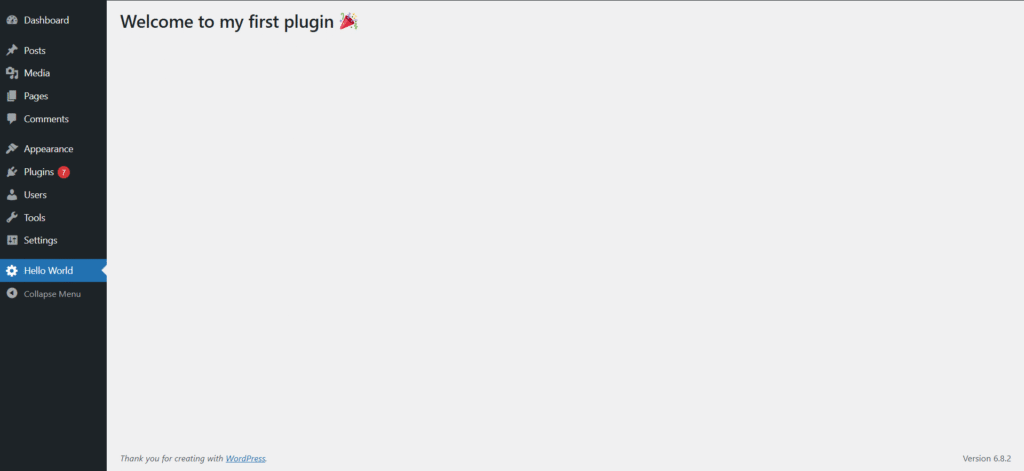
function hw_admin_page() {
echo "<h1>Welcome to my first plugin 🎉</h1>";
}
add_action( 'admin_menu', 'hw_admin_menu' );Here, you can view the page created with this in the Admin Dashboard.
Follow this guide to explore more about Admin and Sub-menu pages in the WordPress Admin Dashboard
Practice Projects to Try
There are some practice projects for you.
These aren’t just “exercises.” But they’re bite-sized wins that give you confidence:
- Custom Footer Text Plugin → Replace WordPress default footer with your own.
- Simple Contact Info Shortcode → Dynamically display email/phone anywhere.
- Custom Greeting Plugin → Show “Good Morning” or “Good Evening” based on the user’s time.
- Random Quote Generator → Output a new motivational quote on each refresh.
Step #5: Learn the Essential WordPress APIs for Plugin Development
Building your first plugin was exciting. But to become a real pro, you need to master WordPress APIs.
Think of APIs as toolkits and pre-built functions, which WordPress gives you for free.
Instead of reinventing the wheel, you can use it in your plugins.
This helps your plugin to interact with WordPress in smarter and more efficient ways.
Options API: Store and Retrieve Settings
Every plugin needs to remember things. That’s where the Options API comes in.
Example: you’re building a Custom Footer Text plugin.
The user types their footer text, and now you will use this API to store the footer message that users will type in.
After this, you can use this API to fetch and display it on every page footer.
Here’s how you can do that:
// Save the Value of Option (input value)
update_option( 'footer_text', 'Powered by My First Plugin' );

// Fetch it later, to show it
echo get_option( 'footer_text' );
Explore more about the Options API here
Settings API: Build Plugin Settings Pages
The Options API saves data, but what about the interface for these options?
That’s the job of the Settings API.
It lets you build forms, fields, and validation inside the WordPress admin dashboard.
It is mainly used to create settings pages for plugins.
Here, we create a settings page using the Settings API to make footer text customizable as per the user’s desire.
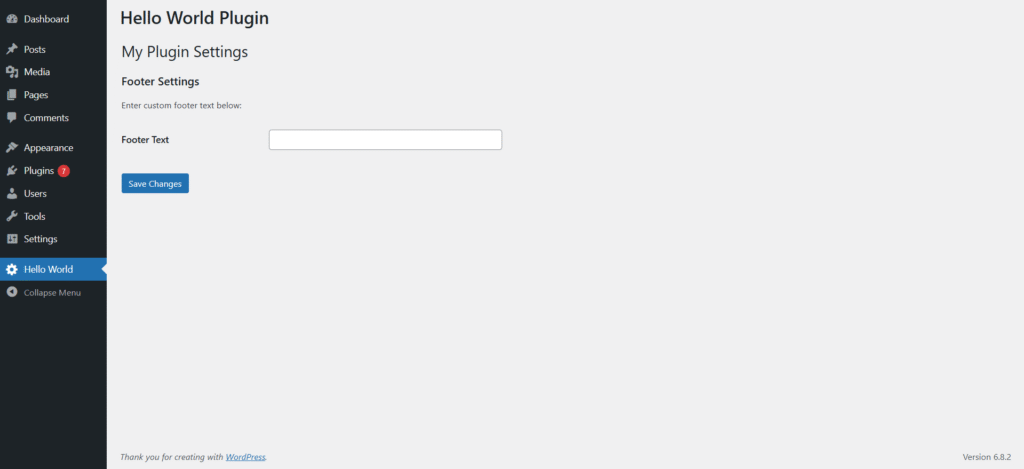
Want to create a Settings page like this? Learn more here about the Settings API
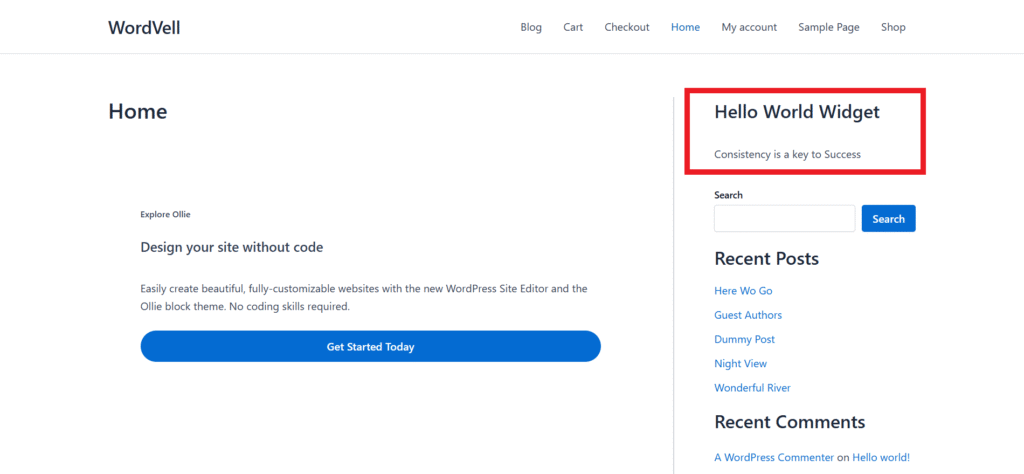
Widgets API: Create Sidebar & Footer Widgets
Want to let users drag and drop some features and show them in sidebars?
The Widgets API makes it possible.
Think Recent Tweets, Popular Products, Recent Posts, or Custom CTA banners can be shown in sidebars.
With just a few lines of code, your plugin can create widgets that users can drop into their sites.
Here, we created a Hello World Widget and added it to the main sidebar:
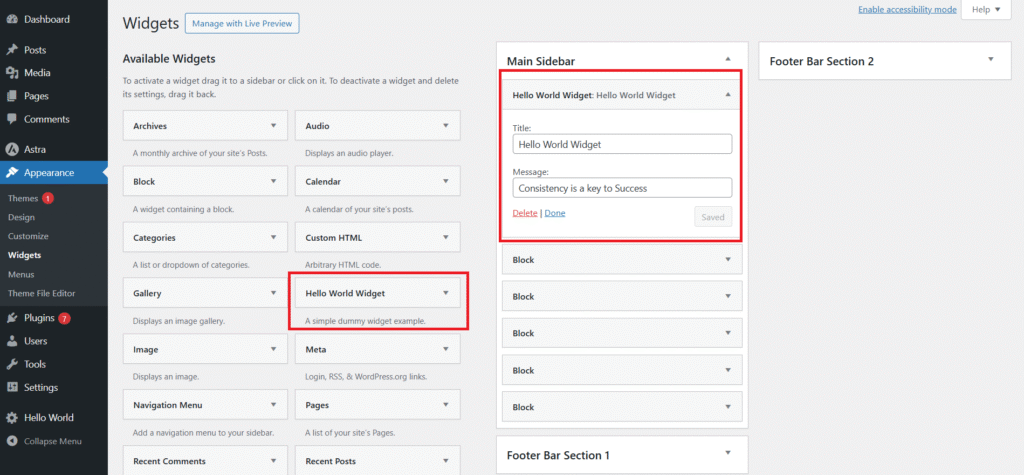
You can add a title and a message in this widget, which will be shown in the main sidebar. Here’s the preview:
Learn more about the Widgets API to create the widgets that you want.
REST API: Build Custom Endpoints
The REST API connects WordPress with the outside world and external frameworks.
Want to pull live weather data into your site?
Or let a React frontend talk to your website?
Or want to build an App for your website?
That’s exactly what REST endpoints help you to do. This API is your gateway to develop large-scale and SaaS-style plugins.
Explore more about REST API here.
Database Interactions with $wpdb
Sometimes you need direct and custom database queries and operations in WordPress.
This is all done by the $wpdb class.
It’s WordPress’s built-in way to talk directly to the MySQL database and execute CRUD operations and SQL queries with proper secure methods.
Think of it as a safe bridge between your plugin and the database.
With $wpdb, you can create your own custom tables, insert new rows, fetch data back for display, and also update and delete data in database tables.
Here is an example where we are inserting data into a custom database table using $wpdb:
// GLobal object of WPDB class
global $wpdb;

// Inserting data into Custom database table using $wpdb
$wpdb->insert(
    $wpdb->prefix . 'my_custom_table',
    array(
        'name' => 'John Doe',
        'email' => 'john@example.com'
    ),
    array( '%s', '%s' ) // Data format
);
Read and learn more about the $wpdb class here
Step #6: Master Advanced WordPress Plugin Development
Now it’s time to enter the big league.
This step is where you master advanced plugin development practices that transform your plugins from simple tools into professional, scalable solutions used by real businesses.
This is where you start to work like a software engineer.
Strengthen OOP in PHP
WordPress is written in PHP, and advanced plugins rely heavily on Object-Oriented Programming (OOP).
Instead of stuffing every function into one file, you should structure your plugin with classes like SettingsManager, FrontendHandler, or DatabaseHandler. This makes your code clean, modular, and future-proof.
Using classes and objects makes your plugins modular, easier to maintain, and scalable as they grow.
Let’s suppose you want to implement one feature at various places or pages of your plugin.
Without OOP, you need to code it everywhere you need to implement it.
Whereas with OOP principles, you will develop it once and implement it everywhere without writing the code repeatedly.
Here’s an example of a container class in the Elementor plugin.
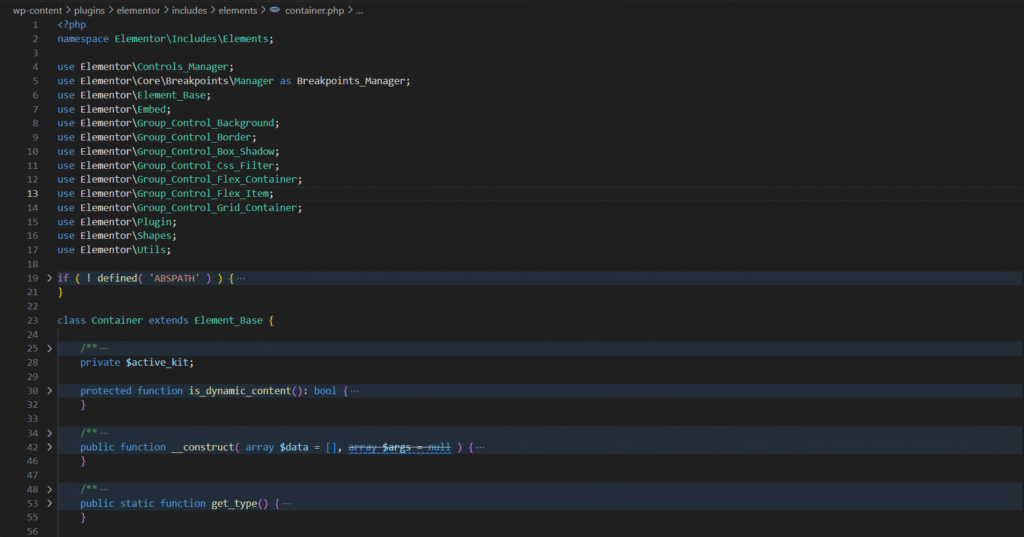
We don’t have to write the code again and again, no matter how many times we add a container using Elementor’s drag-and-drop editor.
Without OOP, we have to write container code whenever we use a container.
Let’s dive into OOPs in PHP here at the guide by W3Schools.
Implement Security Best Practices
Here’s the truth: most plugins fail, not because they lack features, but because they’re insecure.
So, security cannot be compromised.
To secure your plugin always:
- Use nonces to protect forms from CSRF attacks.
- Sanitize and validate every user input.
- Escape data before outputting to the browser.
A secure plugin not only avoids hacks but also earns user trust, which is the most valuable asset if you want people to use (or pay for) your product.
Here is an example of how sanitization is used in the Author Kit plugin on user inputs before saving them into the database:
$username            = isset( $_POST['username'] ) ? (string) sanitize_text_field( wp_unslash( $_POST['username'] ) ) : '';
$email               = isset( $_POST['email'] ) ? (string) sanitize_email( wp_unslash( $_POST['email'] ) ) : '';
$first_name          = isset( $_POST['first_name'] ) ? (string) sanitize_text_field( wp_unslash( $_POST['first_name'] ) ) : '';
$last_name           = isset( $_POST['last_name'] ) ? (string) sanitize_text_field( wp_unslash( $_POST['last_name'] ) ) : '';
$display_name        = isset( $_POST['display_name'] ) ? (string) sanitize_text_field( wp_unslash( $_POST['display_name'] ) ) : $username;
$password            = isset( $_POST['password'] ) ? sanitize_text_field( wp_unslash( $_POST['password'] ) ) : '';
Discover more about Good Security Practices in WordPress here
Add AJAX for Dynamic Interactions
Static plugins feel… outdated.
AJAX brings them to life. It lets your plugins perform actions without reloading the page.
Imagine:
- A to-do list plugin where items update instantly.
- A poll system where votes appear in real time.
- A search bar that shows live results.
- A Form Submission without page reloading
You need to use JavaScript or jQuery to implement AJAX in WordPress.
Here’s an example of code receiving the AJAX request with input data, saving it, and sending back the JSON response after processing:
// Hook to Handle AJAX request
add_action( 'wp_ajax_save_my_data', 'save_my_data' );

function save_my_data() {
    global $wpdb;

    $name  = sanitize_text_field( $_POST['name'] );
    $email = sanitize_email( $_POST['email'] );

    $wpdb->insert(
        $wpdb->prefix . 'my_custom_table',
        array(
            'name'  => $name,
            'email' => $email,
        )
    );

    wp_send_json_success( array(
        'message' => 'Data saved successfully!'
    ) );
}
Note: You will need JavaScript or jQuery to make use of AJAX in WordPress.
Unlock more about AJAX in WordPress here
Custom Post Types, Taxonomies & Custom Fields
This is where WordPress becomes more than a blogging tool.
Want to build plugins for events, portfolios, recipes, or products?
You’ll need Custom Post Types (CPTs) for this purpose.
You can also add taxonomies (like categories/tags) and custom fields to these CPTs as per your desire.
This will allow your plugin to manage any kind of custom structured content in WordPress.
For Example, by using these features, you can create an “Events Management” plugin by adding CPT as Events, Taxonomy as Event Categories, and custom fields like Event Date/Location.
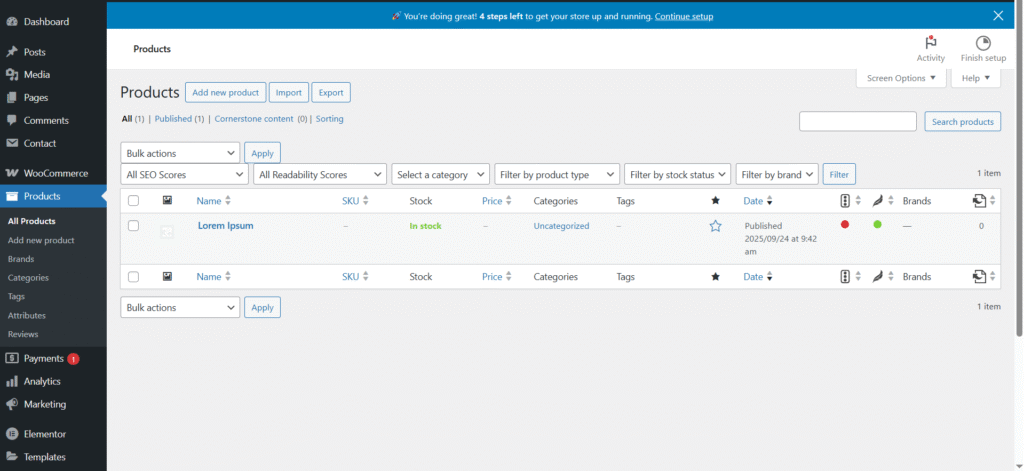
WooCommerce Products are the custom post type developed by WooCommerce.
They also use the custom fields feature to save multiple values of products and use taxonomies to allow dividing products into various categories.
Add Gutenberg Block Support
Gutenberg isn’t the future anymore, but it is the present.
Users expect plugins to work inside the block editor.
By creating custom Gutenberg blocks, you give them drag-and-drop power to insert your plugin features directly into posts.
We use the Gutenberg Block offered by the Prismatic Plugin to highlight the coding examples in our articles.

Understand the development of WordPress Gutenberg Blocks with this guide.
Scheduled Tasks with WP-Cron
Some plugins need to “work in the background.”
That’s where WP-Cron comes in.
Want to:
- Send weekly email reports?
- Clean up expired and old data every month?
- Auto-sync external API data?
WP-Cron allows you to schedule and run those tasks in the background automatically without your intervention.
You can learn more about it here.
Internationalization (i18n) & Localization (l10n)
If you dream of a global audience, your plugin must speak their language.
WordPress provides simple functions like __() and _e() to make every string translatable.
This tiny step allows translators to easily adapt your plugin to any language.
Here, you can see the example where we make the footer text translatable, which we displayed earlier in an example:
function hw_display_message()
{
    _e("Hello World! This is my first plugin 🚀", 'hello-world');
}

add_action('wp_footer', 'hw_display_message');
Practice Projects
There are some projects for your practice related to these concepts. Implement them to grab these concepts:
- Custom Post Type Manager: Build a plugin that manages “Events” or “Recipes.”
- Dynamic AJAX To-Do List: Add, update, and remove tasks in real time.
- Custom Gutenberg Block: Let users drop styled CTAs or testimonials inside posts.
Step #7: Testing and Debugging Your Plugins Like a Pro
Here’s a hard truth: no matter how good you are, bugs will show up. That’s not a failure, but it’s part of the development.
The difference between beginners and professionals is how they test, catch, and fix those issues before users even notice.
Testing gives you confidence that your plugin works everywhere.
Debugging makes you faster at spotting problems and solving them.
Together, they’re what separates a basic plugin from a professional-grade plugin.
WP_DEBUG and Error Logs
This is your first line of defense. By enabling WP_DEBUG and WP_DEBUG_LOG in wp-config.php, you’ll see warnings, notices, and hidden problems in real time.
Here’s how you can configure it in the wp-config.php file:
// Enable WP_DEBUG mode
define( 'WP_DEBUG', true );

// Enable Debug logging to the /wp-content/debug.log file
define( 'WP_DEBUG_LOG', true );
It is important because it will help you catch small issues early before they become a large snowball through user complaints.
Unit Testing with PHPUnit
Manual testing works for small plugins. But as your codebase grows, you need automation.
PHPUnit lets you write tests that run automatically every time you update your code.
You don’t have to waste time rechecking the old features.
Tests alert you instantly if something breaks, giving you confidence to deliver faster.
Cross-Environment Testing
What works on your laptop might crash on someone’s live site.
Because it’ll face dozens of hosting environments, PHP versions (7.4, 8.0, 8.1+), and different WordPress releases.
Testing across various environments and versions ensures your plugin works everywhere, not just for you.
You can use tools like LocalWP or Docker to simulate these environments easily.
WP-CLI for Faster Testing
Clicking through the dashboard to test changes is slow.
With WP-CLI, you can run commands, reset databases, and test scenarios directly from the terminal.
It saves you hours. Faster testing means more time for innovation and less time repeating boring tasks.
Here’s a guide to set up and use WP-CLI.
By mastering testing and debugging, you’re not just writing code, but you’re trying to develop a stable, bug-free plugin that instantly stands out in the WordPress ecosystem.
Users will remember reliability more than flashy features.
Step #8: Follow Best Practices and WordPress Coding Standards
As you grow into advanced plugin development, you need to write clean, efficient, and future-proof code.
So, this is all done through following best practices and coding standards.
This not only improves your own workflow but also makes your plugins easier for others to use, contribute to, or even review for publication on WordPress.org.
Follow WordPress Coding Standards
The WordPress community has established clear guidelines for how plugins should be written.
Tools like PHP CodeSniffer (PHPCS) and WordPress Coding Standards (WPCS) can be installed in your local setup to automatically flag mistakes.
This keeps your code consistent and aligned with professional standards.
There is also a plugin by WordPress named “Plugin Check” which highlights standards violations of your plugin.
Write Clean, Documented Code
Messy code works today, but becomes a nightmare tomorrow.
To write professional and clean code, use
- Clear naming conventions,
- Add inline comments
- Maintain logical structure.
Imagine another developer or your future self trying to fix a bug, so your documentation will be the lifesaver by saving a lot of time and frustration.
Optimize for Performance
A plugin that slows down a website won’t survive long.
So, Learn to
- Write efficient database queries
- Use caching where possible
- Avoid unnecessary loops or functions.
Performance is just as important as functionality, especially when your plugin runs on high-traffic sites.
Ensure Backward Compatibility
WordPress powers millions of websites, many running on older versions.
To maximize your plugin’s reach, ensure backward compatibility.
This doesn’t mean supporting very old releases, but at least test and adapt your code for a reasonable range of WordPress and PHP versions.
When you follow best practices, your plugins stop feeling like side projects and start looking like professional products.
They’re easier to maintain, more trusted by users, and ready for growth.
Step #9: Package & Distribute Your Plugin
Prepare Your Plugin for Release
Before sharing your plugin, make sure it’s properly structured.
Add a plugin header in your main file and create a detailed README.txt file.
This should include a
- Description
- Installation instructions
- Changelog
- FAQs
A clean README improves visibility in the WordPress.org repository and builds trust with users.
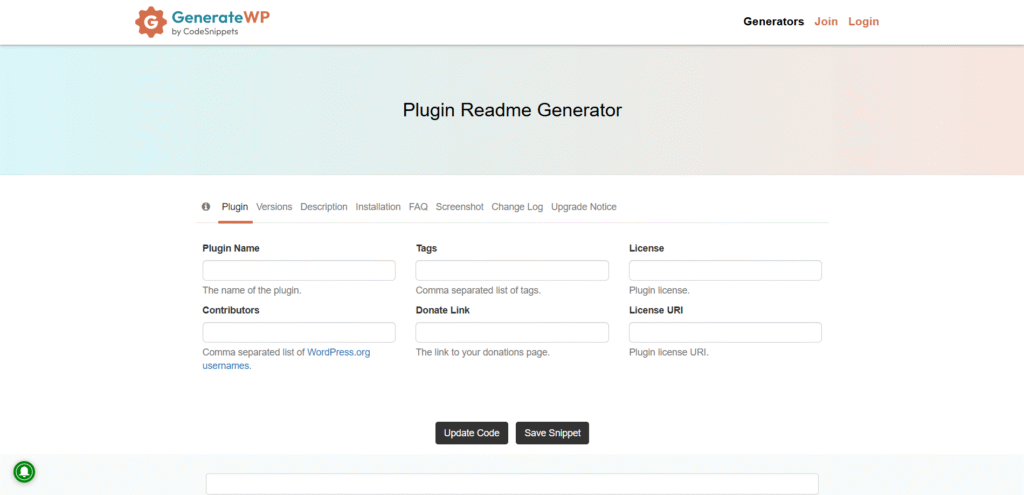
You can generate a WordPress readme through this tool.
Choose Your Distribution Channel
Next, decide where to publish.
For maximum reach, the WordPress.org repository is the best place.
If you want direct monetization, platforms like CodeCanyon, Freemius, or Gumroad are solid options.
You can also sell through your own website to maintain full control over marketing and customer relationships.
Pick the Right Licensing Model
Most WordPress plugins use the GPL license, but you can also adopt a freemium or premium model to earn revenue.
A free version builds trust and reach, while premium upgrades can generate sustainable income.
We prefer that your plugin consist of both free and pro versions. The free version will help to reach and establish a customer base.
While the premium version will help you generate revenue from your trusted customer base by providing more beneficial features
Step #10: Build a Career / Business as a Plugin Developer
So, you know how to build plugins that actually solve problems.
The next question is that…
How do you turn that skill into money, impact, and maybe even a full-blown business?
This step is where plugin development will become a career path.
Let’s break it down.
Freelancing: Your Fastest Gateway
Freelance platforms like Upwork, Fiverr, and Toptal are packed with businesses that are hunting for plugin developers.
Many agencies also outsource work on client projects, giving you steady work while building experience.
It’s instant cash flow with hands-on experience.
You will be able to solve real-world problems, build your portfolio, and create repeat clients.
Many top plugin entrepreneurs started freelancing first.
Sell Premium Plugins: Build Once, Earn Forever
The premium plugin market is growing.
According to WP Tavern, WordPress powers over 43% of the web, which highlights a huge opportunity.
So, you can consider developing premium plugins using subscription or one-time purchase models, which will help you in creating a consistent revenue stream.
Businesses pay big for popular niches like SEO, eCommerce enhancements, security, and site performance tools.
Developing and selling your own plugin is like building an asset that will generate a recurring income for you.
Custom Plugin Services: High-Ticket Clients
Not every company fits into “one-size-fits-all.”
Startups, SaaS founders, and even enterprise clients often need tailored solutions.
Custom plugin development mostly comes with premium pricing. One solid project could generate more for you than months of freelancing.
So, after getting experience, you can also choose this path.
Grow Your Authority: Be Seen, Be Trusted
Sharing knowledge is key to long-term growth and building authority in your niche.
You can start a blog, publish tutorials, contribute to GitHub, or speak at WordCamps to achieve this aim.
When people see your name around the WordPress community, trust builds automatically.
It is important because authority brings better clients, bigger partnerships, and also builds a personal brand that keeps paying dividends.
Teach & Train: From Developer to Mentor
Once you’re confident in your skills, then package your knowledge and create a course.
You can launch a YouTube channel, sell courses on platforms like Udemy, or run workshops.
Developers like Chris Lema and Pippin Williamson built thriving brands not just from code but from teaching.
Teaching creates income streams for you and also builds your reputation as an expert.
This isn’t about choosing one path. The smartest developers stack them: start freelancing → launch a plugin → grow authority → add training.
Each layer adds stability, income, and reach.
At this stage, plugin development is no longer a skill.
It’s your career, your business, and maybe even your legacy in the WordPress ecosystem.
Conclusion & Next Steps
If you have made it this far, then you already know the entire journey to becoming a WordPress plugin developer, from learning the basics of PHP and MySQL to mastering WordPress with advanced APIs.
The roadmap is designed in a way that if you follow it step-by-step, you won’t just learn plugin development, but you will also be in a position to turn your skills into income and influence.
Whether you want to freelance, launch your own premium plugin, or even build a full-fledged WordPress business, the foundation is now in your hands.
But here’s the truth: growth doesn’t stop here.
The WordPress ecosystem moves fast. The developers who win are the ones who keep learning, keep shipping, and stay connected with the community.
Next step for you…
Subscribe to our newsletter to get advanced tutorials, insider strategies, and developer resources.
Don’t just read this roadmap. Take action. Build your career in the WordPress Plugin Ecosystem. We would love to hear about your successful journey.