Discover the
Modern
WordPress with WordVell
What are WordPress Administration Menus? A Definitive Guide
You need a menu in almost every app, website, or software to let users access features and pages easily.
The same thing you need inside the WordPress admin dashboard as well.
If you are building your own plugin or theme, then you will be required to create admin pages and connect them through WordPress Administration Menus.
Otherwise, users cannot properly interact with your features.
That’s why, in this definitive guide, we will take you from beginner to pro level in creating and managing WordPress Administration Menus.
Here’s what we will cover together:
- What admin menus actually are and where they live inside WordPress.
- The difference between top-level menus and submenus, and when to choose each.
- Step-by-Step Instructions for Adding, Removing, and Customizing Menus.
- How to securely handle form submissions inside your plugin’s menu pages.
- Advanced techniques such as positioning, icons, hidden admin pages, and debugging issues.
- Real-world plugin examples.
- Hands-on practice projects so you can apply what you learn.
At its core, an administration menu is simply the navigation you see on the left-hand side of your WordPress dashboard.
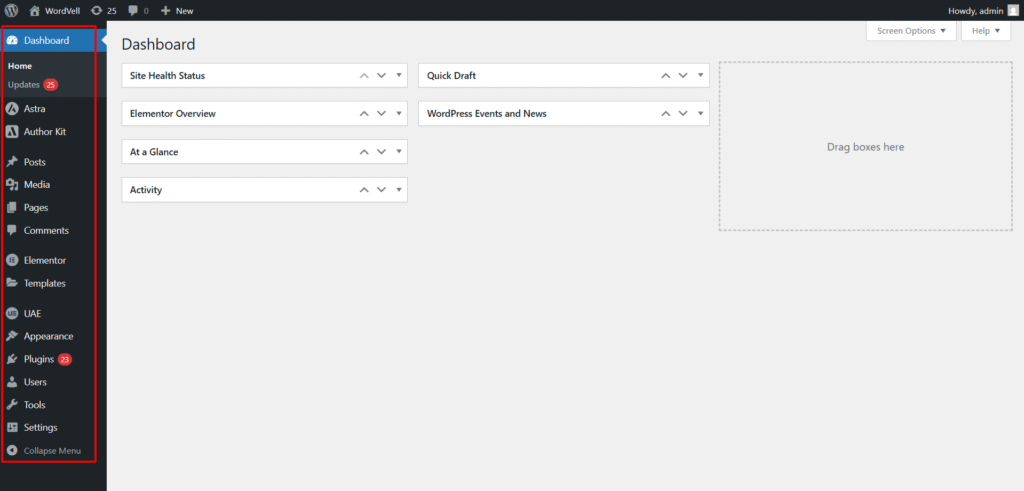
It’s how you move between posts, pages, media, settings, and plugin options. For plugin developers, menus are the bridge between your code and your users.
Without them, your users would not have an intuitive way to view and interact with your plugin’s features.
Think of WooCommerce, without its Products, Orders, and Settings menus, it is nearly impossible to manage an online store.
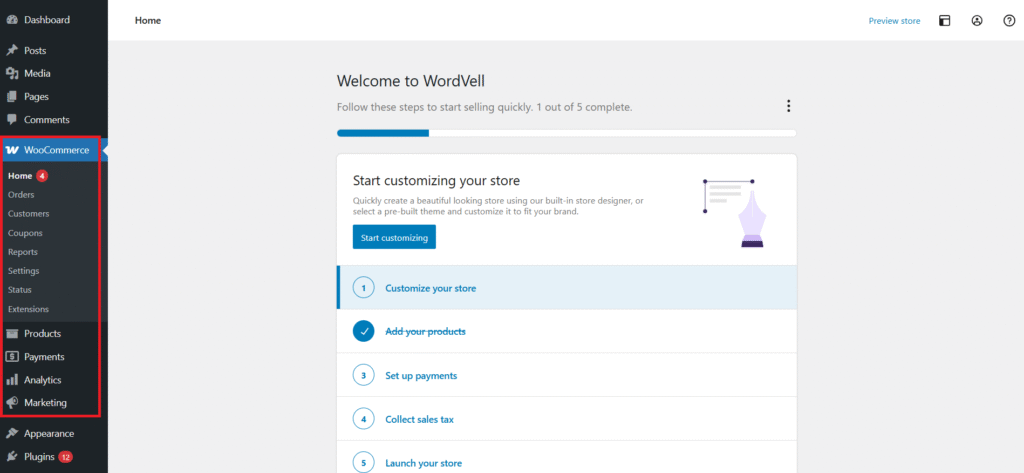
That’s the power of administration menus; that’s why they transform your plugin into a usable tool, not just a chunk of code.
What Are WordPress Administration Menus?
Before we dive into creating menus, let’s pause and answer the simple but essential question: What exactly are WordPress Administration Menus?
WordPress administration menus are the navigation items you see on the left-hand sidebar of the WordPress Admin dashboard (wp-admin).
They act as the control panel for everything, like posts, pages, media, comments, themes, plugins, users, and settings.
Every time you click on “Posts” to write a blog, or “Settings” to adjust your site configuration, you are using an admin menu.
At their core, these menus are simply links that load specific admin pages. WordPress itself provides the standard ones like Posts, Pages, Media, and Settings.
But here’s the interesting part…
The themes and plugins can also register their own menus, making WordPress endlessly flexible.
For example,
When you install Yoast SEO, you will notice a new “Yoast SEO” menu appear in your dashboard.
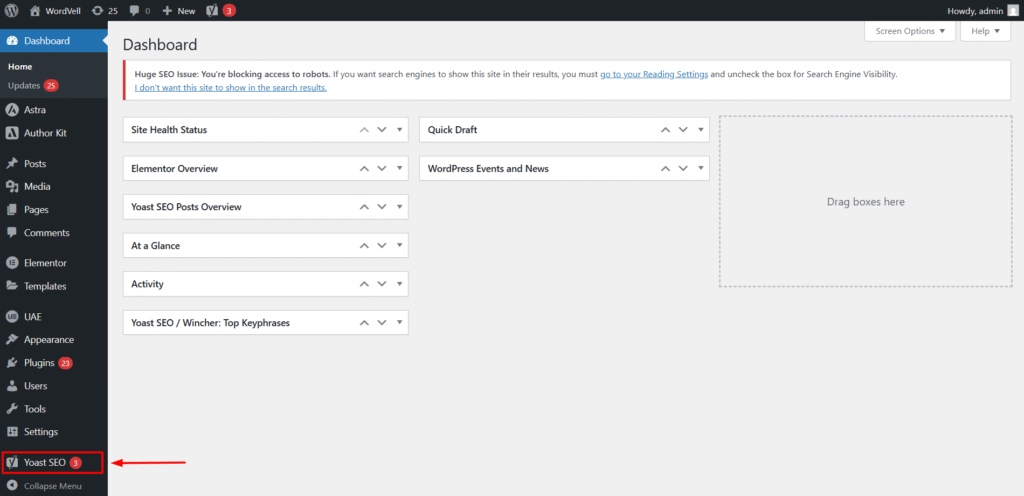
That menu leads you to tools for optimizing your content, managing sitemaps, and checking SEO health.
These custom menus allow plugins to provide a user-friendly way for site owners to interact with their features without ever touching code.
In short, WordPress admin menus are the backbone of how users interact with the system.
Without them, navigating plugins, settings, and content pages would be confusing and unorganized.
What are the Types of Administration Menus?
Now that you know what admin menus are, let’s break them down into the two main types you will encounter:
- Top-level menus
- Submenus.
Understanding the difference is crucial before you start creating your own.
1. Top-Level Menus
The top-level menu is a brand-new, standalone item in the sidebar. They often represent major features or entire plugins.
For example, when you install WooCommerce or Yoast SEO, you have probably seen examples like WooCommerce, Yoast SEO, or Products showing up in the admin menu.
A top-level menu can contain multiple submenus beneath it, giving developers space to organize related features. Think of it as a main folder in your file explorer.
2. Submenus
However, Submenus are the nested items you see when you expand a parent menu.
For example, under Settings, you will find submenus like General, Permalinks, and Reading.
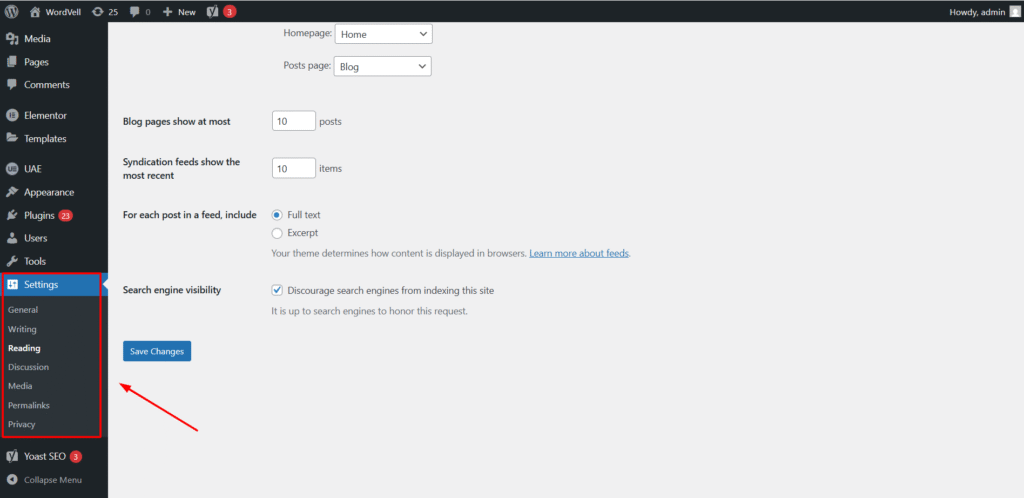
Plugins often use submenus to place their settings inside an existing menu, rather than creating a whole new one.
For instance, a caching plugin might add its options under Settings, keeping the dashboard neat and familiar for users.
Which one to use?
In practice, developers decide whether to use a top-level menu or a submenu based on the size and importance of their feature.
Large plugins need their own menu, while smaller features usually tuck neatly under existing ones.
Working with Submenus
How to Add a Submenu in WordPress Admin Dashboard?
The main function to add a submenu in WordPress is add_submenu_page().
Think of it as telling WordPress: “Hey, under this parent menu, I would like to add my own page.”
Here’s the basic syntax with default arguments:
add_submenu_page(
    $parent_slug,   // Slug of the parent menu (e.g., 'tools.php')
    $page_title,    // Title shown in the browser tab
    $menu_title,    // Title shown in the WordPress menu
    $capability,    // Required capability (e.g., 'manage_options')
    $menu_slug,     // Unique slug for the page
    $callback,      // Function to display content
    $position       // (Optional) Position among submenus
);
Step-by-step example:
- Create a callback function to render HTML.
- Register the submenu using the
admin_menu hook.
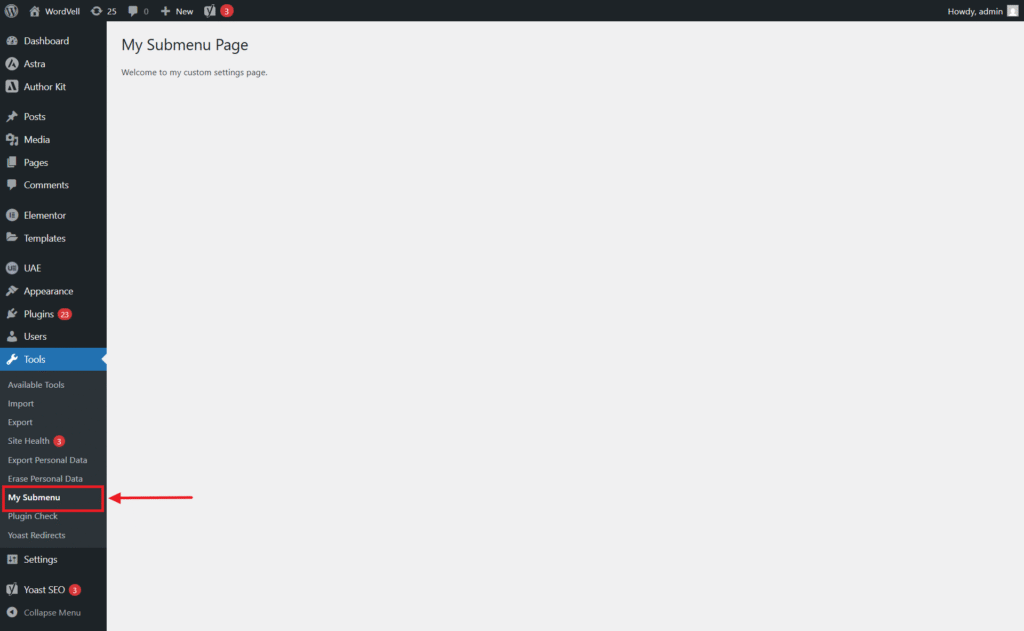
// Step 1: Create a Callback Function.
function myplugin_submenu_page() {
    echo '<div class="wrap"><h1>My Submenu Page</h1><p>Welcome to my custom settings page.</p></div>';
}

// Step 2: Function to register a menu with WordPress Hook
function myplugin_register_submenu() {
    add_submenu_page(
        'tools.php',            // Parent menu
        'My Submenu Title',     // Page title
        'My Submenu',           // Menu title
        'manage_options',       // Capability
        'myplugin-submenu',     // Slug
        'myplugin_submenu_page' // Callback
    );
}

// Step 3: Register a menu with WordPress Hook
add_action('admin_menu', 'myplugin_register_submenu');
This will create a new submenu under Tools → My Submenu.
Predefined Submenu Functions
WordPress gives us shortcut functions when we want to add submenus under core menus without writing the full add_submenu_page(). Some commonly used ones are:
add_dashboard_page()→ Adds a submenu under Dashboard.add_posts_page()→ Adds a submenu under Posts.add_media_page()→ Adds a submenu under Media.add_pages_page()→ Adds a submenu under Pages.add_users_page()→ Adds a submenu under Users.add_theme_page()→ Adds a submenu under Appearance.add_plugins_page()→ Adds a submenu under Plugins.add_options_page()→ Adds a submenu under Settings.add_management_page()→ Adds a submenu under Tools.
Example: Add a submenu under Dashboard
function myplugin_dashboard_submenu() {
    add_dashboard_page(
        'My Dashboard Page',
        'My Dashboard',
        'manage_options',
        'my-dashboard-slug',
        'myplugin_dashboard_page_html'
    );
}

function myplugin_dashboard_page_html() {
    echo '<div class="wrap"><h1>Dashboard Submenu</h1><p>Hello from Dashboard submenu!</p></div>';
}

add_action('admin_menu', 'myplugin_dashboard_submenu');
How to Remove a Submenu from WordPress Admin Dashboard?
Sometimes you want to hide an existing submenu. The function that is used for this purpose is:
remove_submenu_page( $parent_slug, $menu_slug );For example, to hide Tools → Import for non-admins:
function myplugin_remove_submenu() {
    if ( ! current_user_can('administrator') ) {
        remove_submenu_page('tools.php', 'import.php');
    }
}

add_action('admin_menu', 'myplugin_remove_submenu', 999);
This keeps the UI clean while respecting user roles.
How to Submit Forms in Submenu Pages
Adding a submenu is only half the job because most of the time, you will want to save settings or process forms on these pages. Here’s the flow:
Step 1: Point the Form Action to the Submenu Page
You have to use the submenu’s slug as the action of the form with menu_page_url().
This ensures the form posts back to the correct page for submission (whether it’s the same page or another submenu).
<form action="<?php menu_page_url( 'wporg' ); ?>" method="post">
    <input type="text" name="my_field" value="">
    <input type="submit" value="Save">
</form>
Step 2: Register the Submenu and Hook it for submission
When you call add_submenu_page(), it returns a unique $hookname.
This lets you attach a load-$hookname action, which fires before the page loads, which is perfect for catching submissions at that specific page.
function wporg_options_page() {
    $hookname = add_submenu_page(
        'tools.php',
        'WPOrg Options',
        'WPOrg Options',
        'manage_options',
        'wporg',
        'wporg_options_page_html'
    );
    add_action('load-' . $hookname, 'wporg_options_page_html_submit');
}

add_action('admin_menu', 'wporg_options_page');
Step 3: Handle the Submission Securely
Inside the submit handler, check for $_POST data, sanitize it, and save it using the Options API.
function wporg_options_page_html_submit() {
    if ( isset($_POST['my_field']) ) {
        update_option('my_field', sanitize_text_field($_POST['my_field']));
    }
}

function wporg_options_page_html() {
    ?>
    <div class="wrap">
        <h1>WPOrg Options</h1>
        <form method="post" action="<?php menu_page_url( 'wporg' ); ?>">
            <input type="text" name="my_field" value="<?php echo esc_attr( get_option('my_field') ); ?>">
            <input type="submit" value="Save">
        </form>
    </div>
    <?php
}
How it works:
- The
menu_page_url()ensures the form submits to the right menu slug. - The
load-$hooknameaction runs before the page loads, so it can catch submissions. - Data is sanitized and saved with
update_option().
This is the foundation for building plugin settings pages.
Working with Top-Level Menus
Top-level menus are the big items in the WordPress admin sidebar, like WooCommerce, Pages, or Comments.
As a plugin developer, adding one gives your plugin a prominent spot in the dashboard. Let’s break it down.
How to Add a Top-Level Menu in WordPress Admin Dashboard?
To create a new main menu, you have to use the add_menu_page() function.
Function signature:
add_menu_page(
    $page_title,
    $menu_title,
    $capability,
    $menu_slug,
    $callback = '',
    $icon_url = '',
    $position = null
);
Arguments explained:
$page_title→ Title shown in the browser tab.$menu_title→ Label visible in the sidebar.$capability→ Permission required (e.g., manage_options).$menu_slug→ Unique ID for your menu (used in the URL).$callback→ Function that outputs the HTML content.$icon_url→ Icon for your menu (Dashicons, custom SVG, or base64 image).$position→ Sidebar order (lower = higher priority).
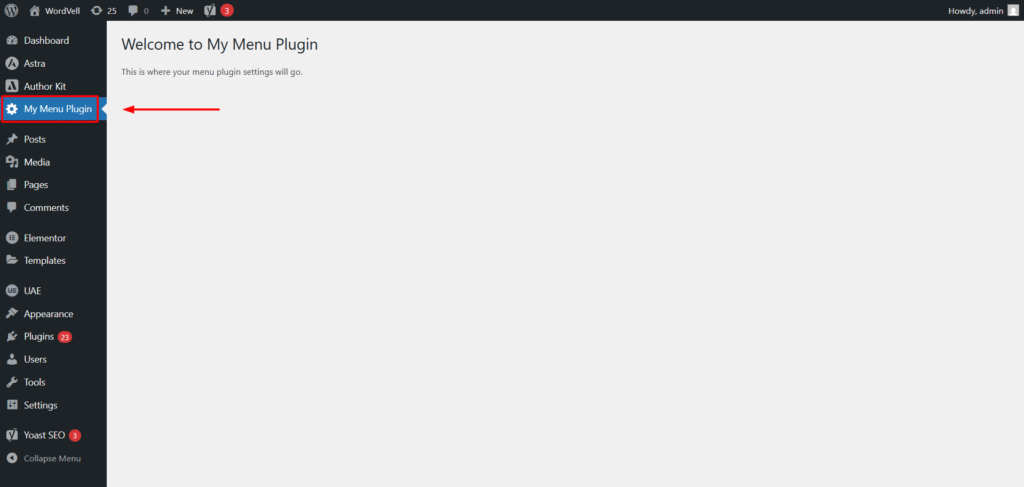
Example: Add “My Menu Plugin” Admin Page
Here’s a simple step-by-step setup:
// Step 1: Define the callback
function myplugin_admin_page_html() {
    ?>
    <div class="wrap">
        <h1>Welcome to My Plugin</h1>
        <p>This is where your plugin settings will go.</p>
    </div>
    <?php
}

// Step 2: Register the menu
function myplugin_register_menu() {
    add_menu_page(
        'My Menu Plugin Settings',   // Page title
        'My Menu Plugin',            // Menu title
        'manage_options',            // Capability
        'my-menu-plugin',            // Menu slug
        'myplugin_admin_page_html',  // Callback
        'dashicons-admin-generic',   // Icon
        20                           // Position
    );
}

add_action('admin_menu', 'myplugin_register_menu');
Now you will see My Menu Plugin as a shiny new item in the sidebar.
Using Separate Files for HTML of the Page
To keep your plugin clean, you can move the admin page markup (HTML content) into a dedicated file.
Here is the revised callback for the scenario mentioned above:
function myplugin_admin_page_html() {
    include plugin_dir_path( __FILE__ ) . 'admin-page.php';
}
This way, your main plugin file stays light, and you can organize settings pages in their own PHP files.
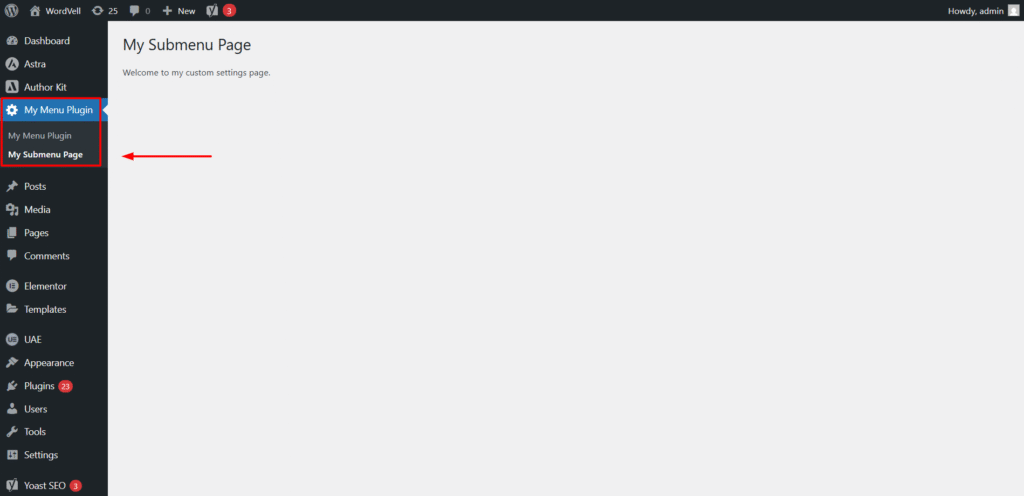
How to Create a Submenu Under Your Custom Top-level Menu?
To create a submenu under your custom-developed top-level menu, you have to place your top menu slug in the parent slug parameter of add_submenu_page() the function
// Step 1: Create a Callback Function.
function myplugin_submenu_page() {
    echo '<div class="wrap"><h1>My Submenu Page</h1><p>Welcome to my custom settings page.</p></div>';
}

// Step 2: Function to register a menu with WordPress Hook
function myplugin_register_submenu() {
    add_submenu_page(
        'my-menu-plugin',       // Top-level menu slug
        'My Submenu Title',     // Page title
        'My Submenu Page',           // Menu title
        'manage_options',       // Capability
        'my-plugin-submenu',     // Slug
        'myplugin_submenu_page' // Callback
    );
}

// Step 3: Register a menu with WordPress Hook
add_action('admin_menu', 'myplugin_register_submenu');
Now, you will see a submenu under your top-level admin menu
How to Remove a Top-Level Menu from WordPress Admin Dashboard?
Sometimes, you want to hide a menu for specific roles. So, remove_menu_page() is used for this purpose.
Example: Hide Comments for Editors:
function myplugin_remove_menu() {
    if ( ! current_user_can('administrator') ) {
        remove_menu_page('edit-comments.php');
    }
}

add_action('admin_menu', 'myplugin_remove_menu');
How to Submit Forms in Top-Level Menus
Just like submenus, a top-level menu often needs to save plugin settings or process forms. Here’s the step-by-step flow:
Step 1: Point the form to the top-level menu page
You have to use menu_page_url() with your menu slug in the form’s action.
This ensures the form posts back to the correct menu page for submission (whether it’s the same page or another submenu).
<form action="<?php menu_page_url( 'myplugin' ); ?>" method="post">
    <input type="text" name="my_field" value="">
    <input type="submit" value="Save">
</form>
Step 2: Register the Menu and Hook into Load-$hookname
When you create a top-level menu with add_menu_page(), it returns a $hookname. Use this to attach a submission handler.
function myplugin_register_menu() {
    $hookname = add_menu_page(
        'My Plugin Settings',
        'My Plugin',
        'manage_options',
        'myplugin',
        'myplugin_admin_page_html',
        'dashicons-admin-generic',
        20
    );
    add_action('load-' . $hookname, 'myplugin_admin_page_submit');
}

add_action('admin_menu', 'myplugin_register_menu');
Step 3: Handle the Form Submission Securely
Check for posted data, sanitize it, and save it with the Options API.
function myplugin_admin_page_submit() {
    if ( isset($_POST['my_field']) ) {
        update_option('my_field', sanitize_text_field($_POST['my_field']));
    }
}
How it Works:
menu_page_url()→ ensures the form submits to the correct menu slug.load-$hookname→ catches submissions before the page renders.sanitize_text_field()+update_option()→ secure data storage.
With this setup, your top-level menu becomes a fully functional settings hub, just like big-name plugins (WooCommerce, Yoast SEO) that store user options in the database.
How to Secure Admin Forms in WordPress?
Whenever you add forms to WordPress admin menus, security must come first.
Otherwise, you risk unauthorized users changing settings or malicious code slipping into your database.
1. Check User Permissions to Prevent Unauthorized Access
Always wrap your logic with current_user_can(). For example, only administrators should manage plugin settings:
if ( ! current_user_can('manage_options') ) {
    return;
}
2. Use Nonces to Prevent a CSRF Attack
A nonce (“number used once”) prevents CSRF attacks. Add it to your form with wp_nonce_field(), then verify it on submission with check_admin_referer().
<form method="post">
    <?php wp_nonce_field('myplugin_save', 'myplugin_nonce'); ?>
    <input type="text" name="my_field">
    <input type="submit" value="Save">
</form>

function myplugin_admin_page_submit() {
    if ( isset($_POST['myplugin_nonce']) ) {
        check_admin_referer('myplugin_save', 'myplugin_nonce');
    }

    if ( isset($_POST['my_field']) ) {
        update_option('my_field', sanitize_text_field($_POST['my_field']));
    }
}
3. Sanitize Inputs to Prevent Insecure Data
Before saving, clean the received data with functions like sanitize_text_field(), esc_url(), or intval().
It will help you remove any insecure data that is passed through the request.
With permissions, nonces, and sanitization, your admin forms are both functional and secure.
Advanced Customization: Positioning, Custom Icons, URLs, and Hidden Pages
Once you have mastered the basics of adding menus, you can take things further with customization.
Menus Positioning: How to Place Admin Menus on Top or Position You Desire?
The $position parameter in add_menu_page() or add_submenu_page() lets you control where your item appears in the sidebar.
For example, 5 places it near “Dashboard,” while 80 is closer to “Settings.” Experiment until it fits logically with related items.
Custom Icons: How to Add a Custom Icon to WordPress Admin Menu?
Top-level menus can have icons. WordPress supports Dashicons (e.g., dashicons-admin-generic), but you can also use custom SVGs or even a base64-encoded image for branding.
add_menu_page('My Plugin',
    'My Plugin',
    'manage_options',
    'myplugin',
    'myplugin_callback',
    'dashicons-admin-tools',
    25
);
Menu URLs
Every menu slug becomes part of a URL like:
/wp-admin/admin.php?page=mypluginThis is how you can link directly to your admin page.
Hidden Admin Pages: How to Create an Admin Page in WordPress Without Showing it on the Admin Menu
Sometimes you need a page without visibility from the admin menu (e.g., a setup wizard).
So, you have to call add_submenu_page() with null (or an empty string) as the parent slug. WordPress will register the admin page, but will not add it to any menu link.
You can access it directly at /wp-admin/admin.php?page=your-slug.
add_action('admin_menu', function() {
    add_submenu_page(
        '',                      // parent = null or emplty => no menu entry created
        'Hidden Page Title',     // page title
        'Hidden Menu Title',     // menu title (not shown)
        'manage_options',        // capability
        'my-hidden-page',        // menu slug (used in URL)
        'my_hidden_page_render'  // callback
    );
});

function my_hidden_page_render() {
    if ( ! current_user_can('manage_options') ) {
        return;
    }
    echo '<div class="wrap"><h1>Hidden Admin Page</h1><p>Access via: ' . esc_html( admin_url('admin.php?page=my-hidden-page') ) . '</p></div>';
}
These enhancements give your plugin’s admin area a professional, user-friendly feel while keeping advanced options neatly organized.
Best Practices for WordPress Admin Menus
Follow these rules to keep your plugin menus professional and user-friendly:
- Don’t overload the sidebar – Only create a top-level menu if your plugin has multiple important pages. Otherwise, place it under “Settings” or another logical parent.
- Group related features – Keep reports, settings, and tools as submenus under one parent for easier navigation.
- Use clear names and icons – Labels should be short and meaningful. Stick to familiar Dashicons or a simple custom SVG.
- Respect user roles – Check permissions with
current_user_can(). Don’t expose sensitive pages to non-admins. - Keep code modular – Separate logic into files or classes. Example:
/admin
     /views/settings-page.php
     /classes/class-admin-menu.php
A clean structure and thoughtful design ensure your plugin integrates seamlessly with WordPress and provides a smooth experience for site owners.
Practice Projects to Master Admin Menus
Theory is only half the learning. The real skill comes from practice.
Try these small projects to strengthen your WordPress admin menu skills:
- Submenu under Settings
Add a submenu called “Custom Option” beneath “Settings.” Create a simple form that saves a text field usingupdate_option(). - Top-Level “My Plugin” Menu
Build a new top-level menu titled “My Plugin” with its own settings page. Use an icon (Dashicon or custom SVG) to make it stand out. - Hidden Admin Page
Create a hidden page by registering a submenu with null as the parent slug. Access it directly via/wp-admin/admin.php?page=my-hidden-page. - Secure Form Submission
Add a form withwp_nonce_field()and verify withcheck_admin_referer(). Restrict access usingcurrent_user_can('manage_options').
Completing these projects will give you hands-on confidence to build professional plugin interfaces.
Real-World Examples of Admin Menus
Many popular plugins showcase different menu strategies:
- Yoast SEO: Adds a top-level “Yoast SEO” menu with multiple submenus like General, Search Appearance, and Social. Great for feature-rich plugins.
- WooCommerce: Uses a top-level menu with sections for Orders, Reports, Products, and Settings. Ideal for large-scale plugins with many tools.
- Contact Form 7: Keeps things simple with just one submenu under “Contact.” Perfect for lightweight plugins.
Lesson: Choose your menu style based on plugin complexity. Use one submenu for simple tools, full top-level menus for complex and feature-heavy solutions.
Additional Resources
Want to dig deeper? Here are the must-have references:
- Plugin Handbook – Administration Menus: The official guide to building and structuring menus.
- Function References:
- add_menu_page()
- add_submenu_page()
- remove_menu_page()
- Settings API – for creating and managing settings pages.
- Options API – for handling and saving options securely.
- Dashicons Reference: Browse built-in WordPress icons to style your menus.
These resources will help you refine your skills efficiently as you build more complex admin menus.
Conclusion & Next Steps
WordPress administration menus are more than just navigation items. They shape how users experience your plugin.
By mastering top-level menus, submenus, form handling, security, and customization, you can give your plugins a professional, intuitive interface that users can trust.
Finally, subscribe to our newsletter for more updates in this series and also for exclusive e-guides, strategies, tutorials, developer resources, learning resources, and the latest WordPress news to keep you ahead.