Discover the
Modern
WordPress with WordVell

How to Set Up Cloudflare with Your WordPress Site for Better Speed and Security? (Complete Step-by-Step Guide in 2026)
Do you want to learn how to set up Cloudflare with your WordPress site to improve speed and security?
It’s easy that you get stuck or run into roadblocks during DNS Configuration at initial setup or in settings such as SSL, caching, and security optimization.
You need to be precise with these settings, as even a minor error can accidentally cause connection problems, redirect loops, email breakage, or temporary downtime.
But the right connection and configuration enable Cloudflare to sit between your users and server, allowing it to cache content, block malicious traffic, and handle SSL without stressing your origin server. This leads to improved load time, uptime, security, and crawl efficiency simultaneously.
In this guide, we will outline the exact steps we follow to set up Cloudflare with WordPress sites, as well as the checks we use to avoid common failures.
By the end of this guide, you’ll be able to:
- Set up and connect your domain to Cloudflare
- Configure SSL, caching, speed, and security settings correctly
- Connect Cloudflare with WordPress using the official plugin
Let’s understand Cloudflare first, and then we’ll guide you through the connection steps…
What Is Cloudflare and Why Connect Your Site to It?
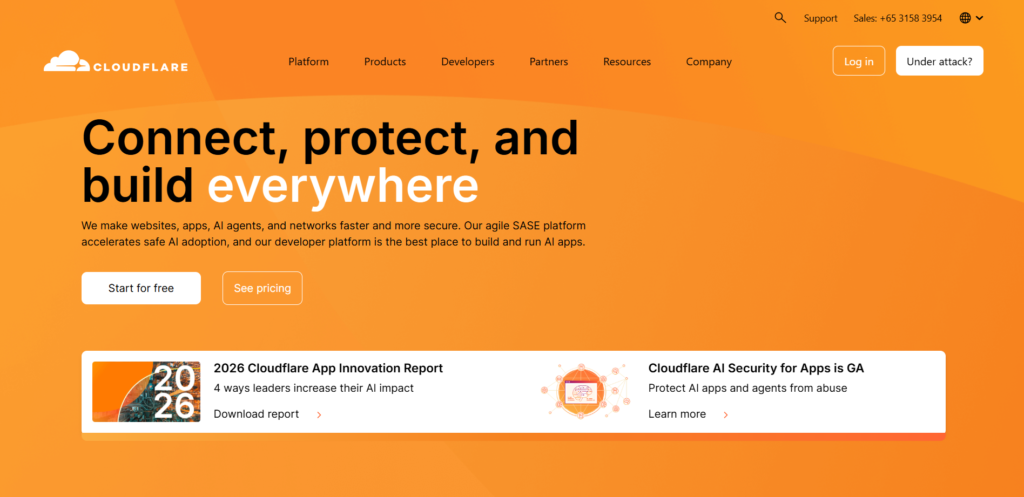
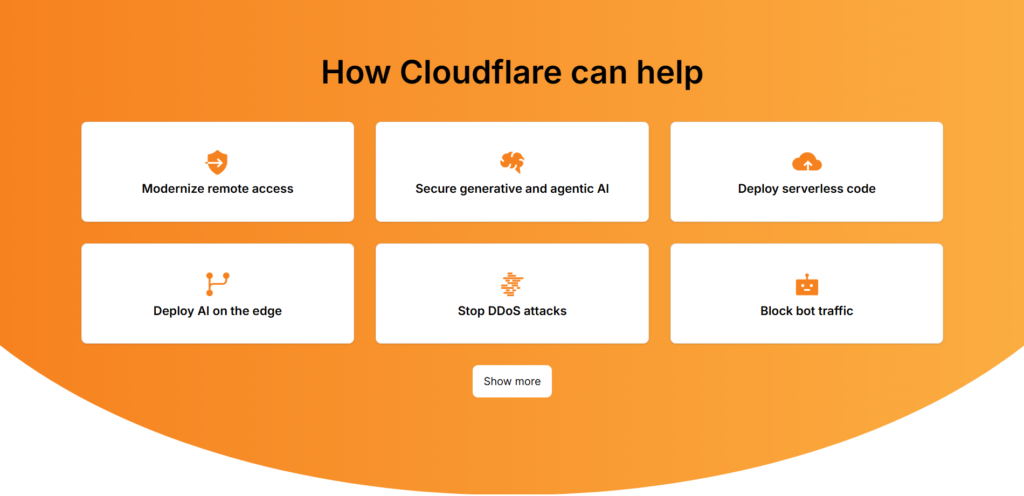
Cloudflare is a global edge network that combines speed (CDN), security, DNS, reliability, and performance optimization services into a single layer between your website users and your server.
Instead of every request hitting your origin server directly, Cloudflare routes traffic through its edge data centers, where it can cache content, filter malicious requests, offer high security, and serve optimized responses closer to the user.
It acts as a smart middle layer that reduces load on your server while improving load speed and blocking spammy traffic before it even reaches your hosting environment.
For WordPress developers, this matters because it secures your WordPress site against DDoS and brute force attacks using multiple security features, such as rate limiting and a WAF (Web Application Firewall).
It also boosts global speed using CDN and APO (Automatic Platform Optimization), and reduces latency due to distributed servers all over the world.
Key Benefits You Actually See in Real Projects
- Improved security: Cloudflare blocks DDoS attacks, filters malicious bots, and adds WAF protection, and features like Cloudflare Tunnel even let you expose services without revealing your server IP.
- Enhanced performance: Static and dynamic content gets cached across a global network of 250+ data centers, which reduces latency and improves load times for users in different regions.
- Reduced server load: Cached responses mean fewer hits to your origin, which directly lowers bandwidth usage and prevents server overload during traffic spikes.
- Fast DNS propagation: Cloudflare DNS updates are typically faster and more reliable than many traditional registrars.
- Free SSL/TLS: You get automatic HTTPS with free certificates, which removes browser warnings and improves trust and SEO signals.
- Easy setup and analytics: You can monitor traffic, cache rates, and blocked threats directly from a clean dashboard without extra tools.
Quick Stat: Cloudflare’s Automatic Platform Optimization (APO) can significantly improve WordPress performance, with reported cases showing up to 300% faster load times.
Prerequisites
Before we start, make sure you have these basics in place:
- Access to your domain registrar dashboard (to update nameservers)
- Admin access to your WordPress site with permission to install plugins
- A full-site backup (files + database), so you can quickly roll back if anything goes wrong
How to Set Up Cloudflare with WordPress Site (Step-by-Step)
We’ll guide you through the exact steps to connect your domain, configure DNS and SSL correctly, apply performance settings, and integrate Cloudflare with WordPress, all without breaking your site or email.
Step 1: Cloudflare Account & Site Onboarding
In this phase, you will create your Cloudflare account, import DNS records, and prepare your domain for a smooth Cloudflare connection.
1. Create an Account
Start by going to Cloudflare and clicking on the “Sign Up” button.
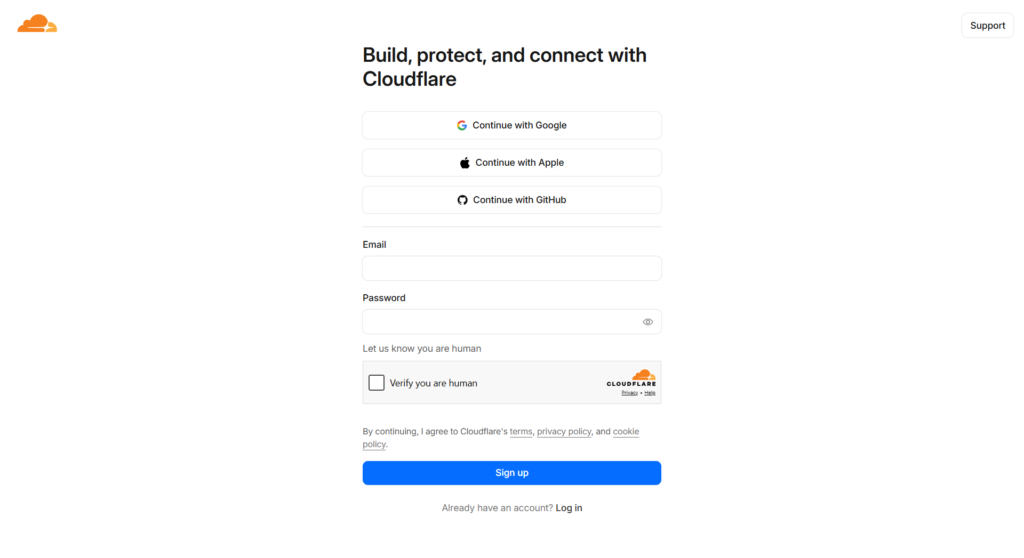
Enter your email and password, complete the reCAPTCHA, and submit the form to create your account.
Before proceeding, verify your email address, as Cloudflare restricts certain actions until verification is complete.
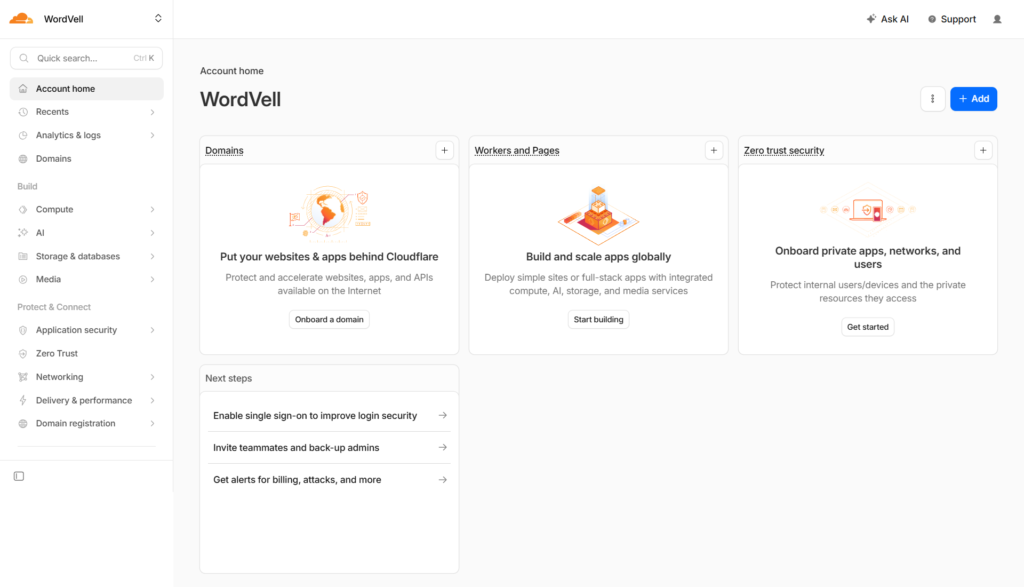
Now, you will see the Cloudflare Configuration Dashboard.
If you prefer a quicker setup, you can also sign up using Google, Apple, or GitHub, which skips manual verification steps.
2. Add Your Site and Do Initial Setup Settings
Once logged in, click on the Add Site button and choose Connect a Domain to begin onboarding your website.
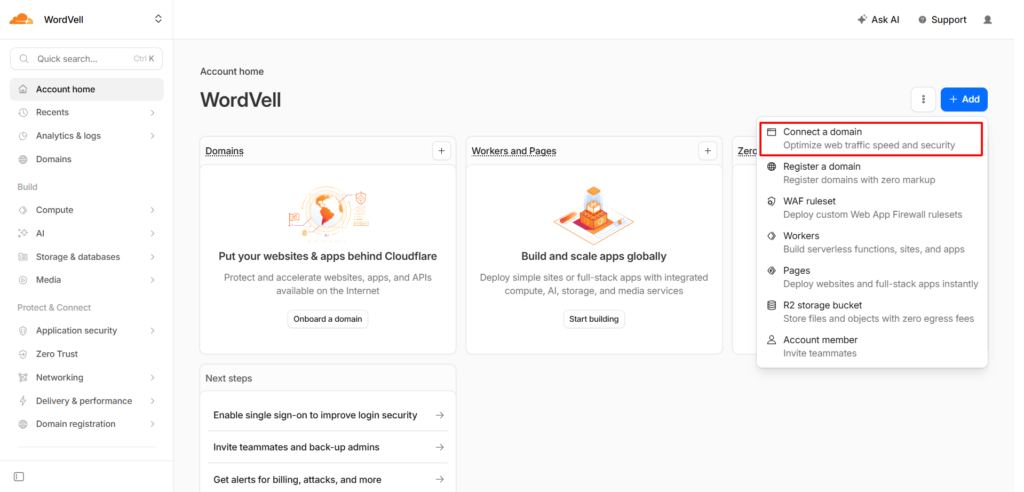
Enter your domain name (for example, wordvell.com), and configure the way you want to fetch or add the DNS of your site.
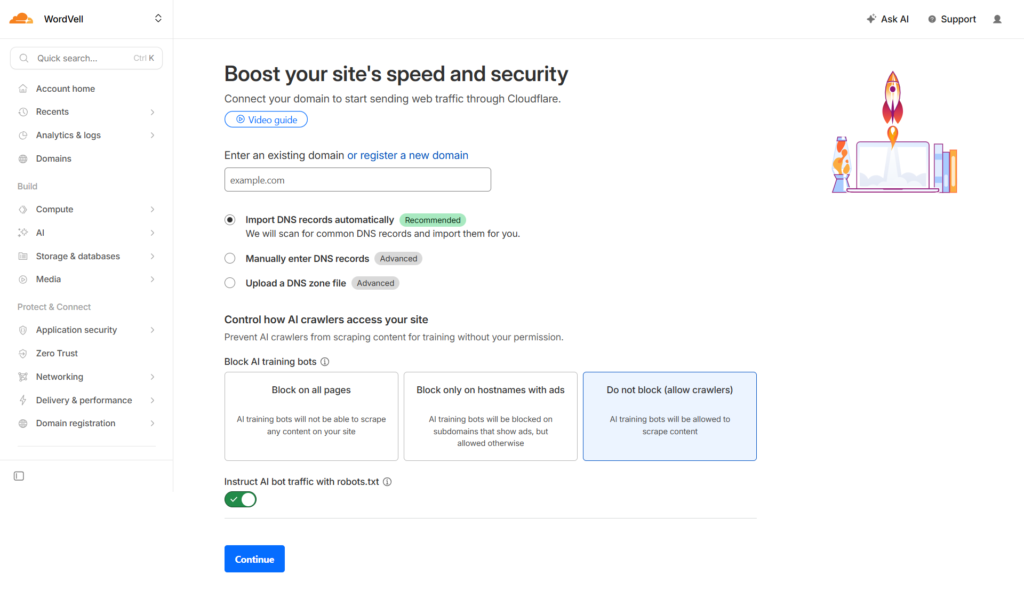
For most WordPress developers, selecting ‘Import DNS automatically’ is the safest and fastest option, as it pulls existing records without requiring manual entry.
If you’re running a more advanced setup, like custom email routing or multiple subdomains, you can manually add DNS records or upload a zone file instead.
At this stage, you’ll also see AI crawler settings.
If you want your site to appear in AI search results and overviews, keep crawlers allowed; otherwise, you can block them either globally or only on ad-related hostnames.
Note: Don’t worry, you can change the AI bots’ settings later.
Once everything looks right, click Continue.
3. Select a Plan
Cloudflare will now ask you to choose a plan based on your needs.
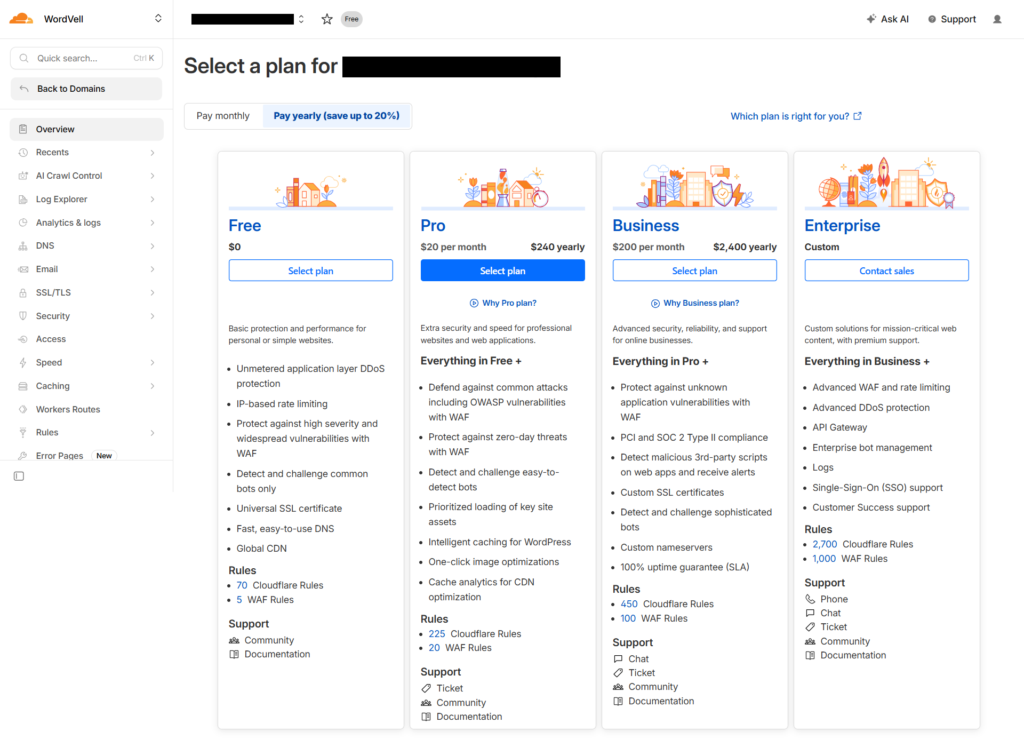
For most WordPress sites, the Free plan is more than sufficient to enable CDN, SSL, and basic security features.
You can always upgrade later if you decide to utilize advanced features, such as APO or additional firewall controls.
Select the Free plan and move forward.
4. Review DNS Records
Cloudflare will now scan your domain and display all DNS records in a table.
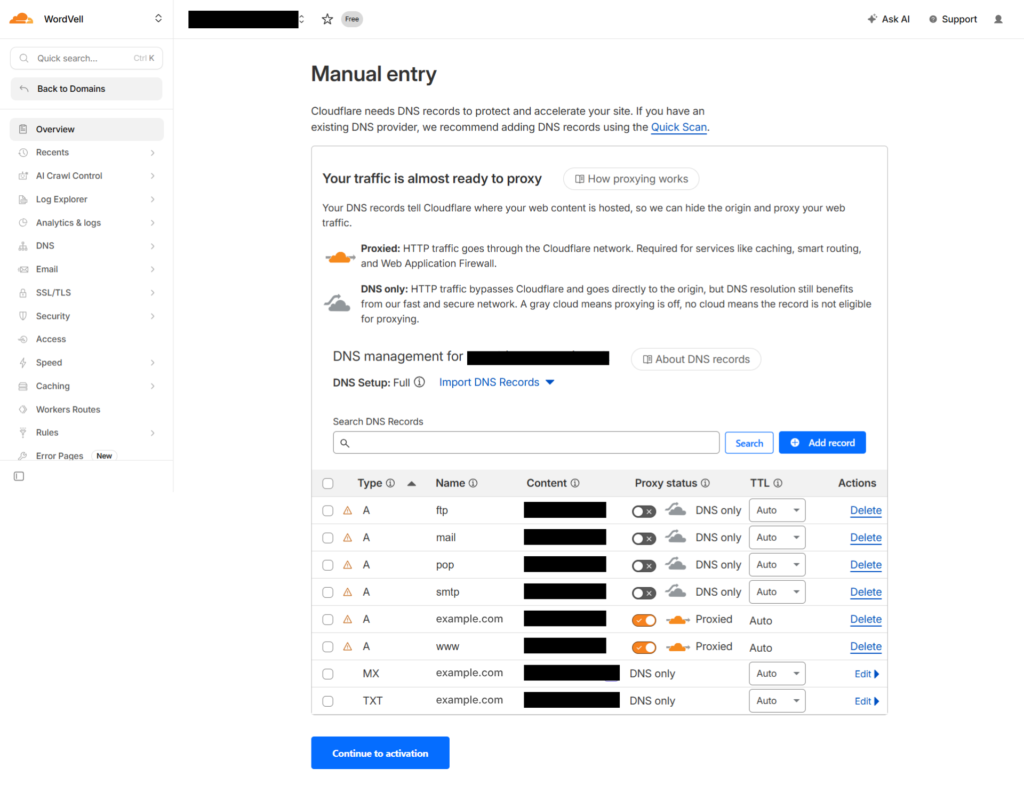
You should take an extra moment on this section because here, in this part, accurate settings are vital for keeping your site and email online. Otherwise, incorrect settings can cause your site or email to malfunction.
Set your main domain and “www” records to Proxied (orange cloud), which enables Cloudflare’s CDN and protection layer.
For services such as email, FTP, SMTP, and POP, switch them to DNS Only (grey cloud) so they bypass Cloudflare and continue to work normally.
MX and TXT records should remain DNS only by default, so don’t change them.
After reviewing, click Continue to Activation.
5. Get Your Nameservers
In the final step of this phase, Cloudflare will assign you two unique nameservers.
These look something like this:
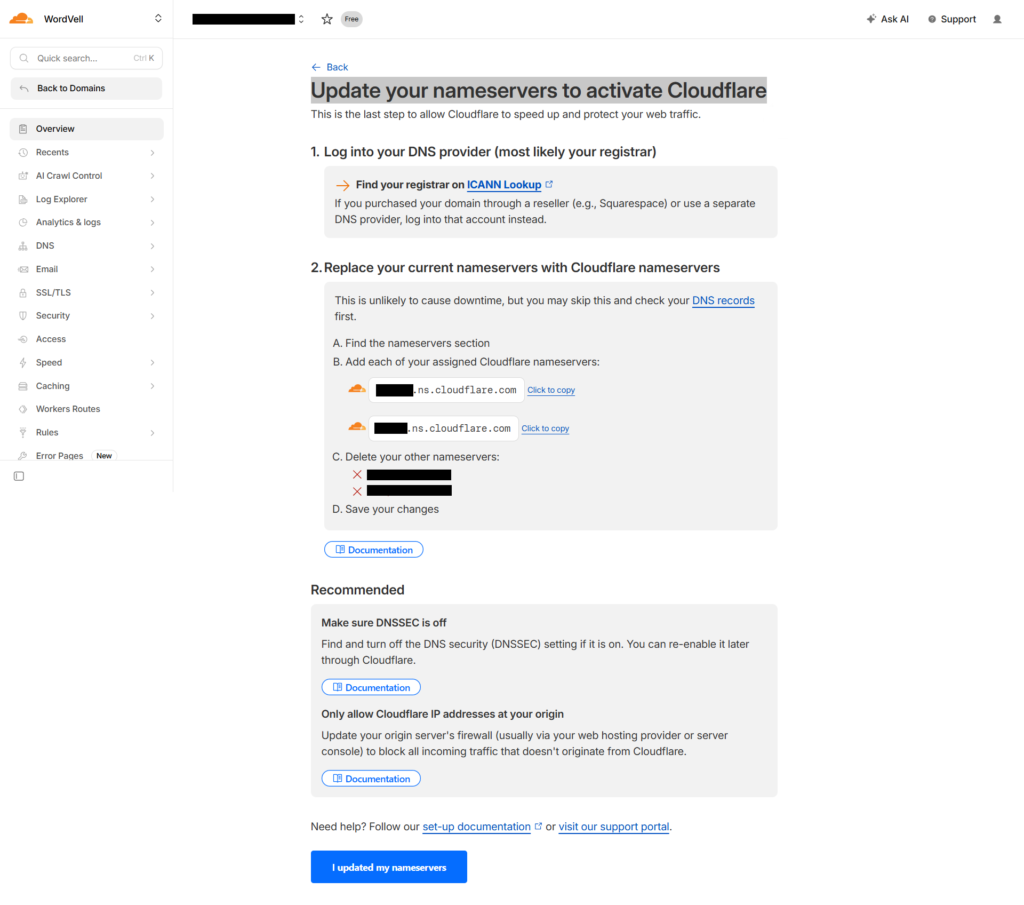
Copy these nameservers carefully, because you’ll need them in the next phase to connect your domain through your registrar.
Step 2: Update Nameservers at Registrar
Now, you will connect your domain to Cloudflare by updating the nameservers in your domain registrar’s dashboard.
- Log in to your Domain Registrar account (like Hostinger, GoDaddy, or Namecheap) where your domain is currently managed.
- Go to the Domains section. Find and select the domain you want to connect with Cloudflare.
- Look for options like DNS Management, Nameservers Settings, or Manage DNS, depending on your provider.
- Switch the nameserver type from “Default” to Custom so you can manually define them.
- Paste the two Cloudflare nameservers you copied from Cloudflare exactly as provided.
- Save changes. Once saved, your domain will start pointing to Cloudflare.
Note: Propagation usually takes between 15 minutes and a few hours, but in some cases, it can take up to 24 hours. Don’t worry, your site will remain accessible during this time.
- Now, go back to Cloudflare and click “I updated my nameservers.”
- Cloudflare will automatically check periodically and notify you once your domain becomes active.
Step 3: Critical Cloudflare Settings to Configure
While you wait for the nameservers to update, use this time to configure these settings in the Cloudflare Dashboard to ensure your WordPress site works perfectly with great speed and security.
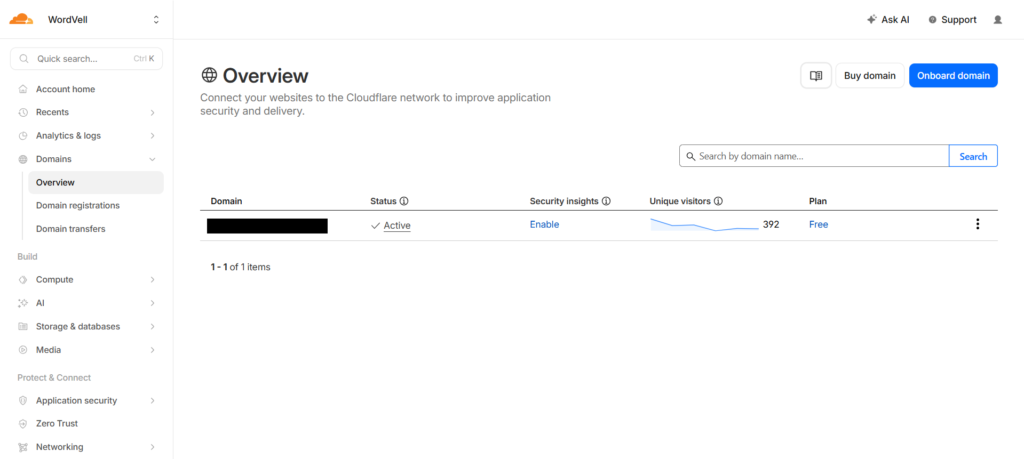
Go to Cloudflare Dashboard → Domains → your domain, and you’ll land inside the domain management panel where all core settings live.
Let’s configure the essentials we use on real WordPress setups.
1. SSL/TLS Configuration (Don’t Skip This)
Go to SSL/TLS → Overview and set encryption mode to Full (Strict) if your origin already has a valid SSL certificate.
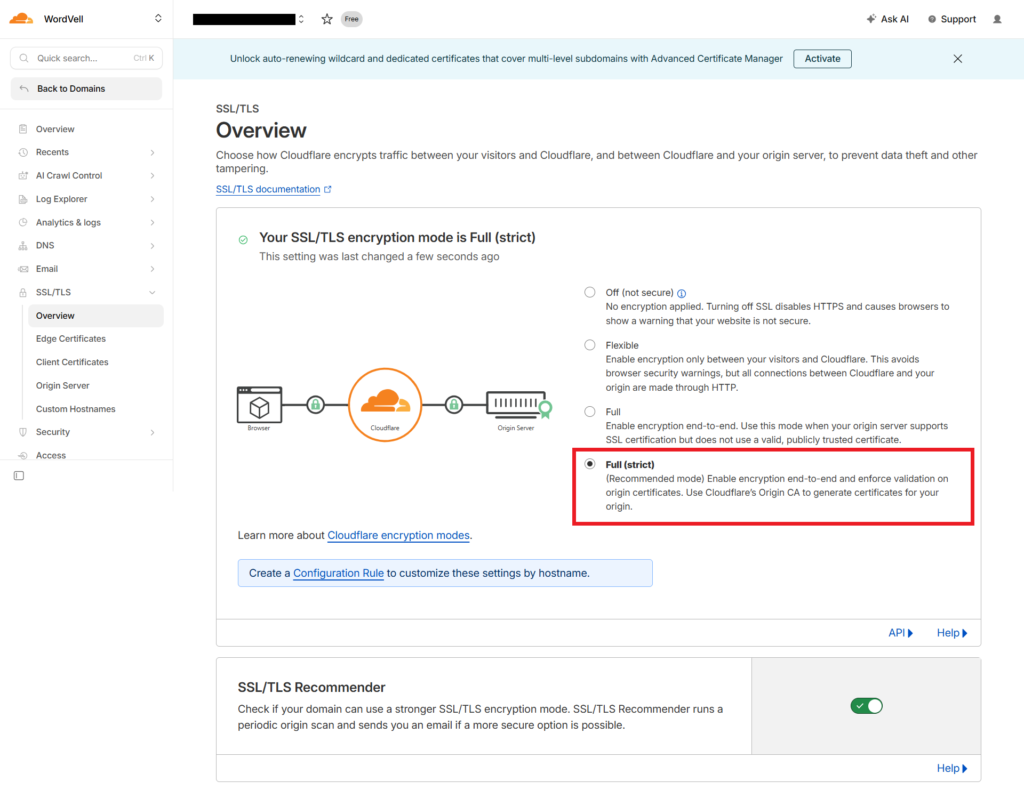
If your server doesn’t have one yet, create it using your host or Cloudflare Origin Certificate, then install it before switching.
Flexible mode might look easier, but it often causes redirect loops in WordPress, especially when HTTPS is already forced at the application level.
For More Information about Full Strict SSL Mode, visit the official Cloudflare docs.
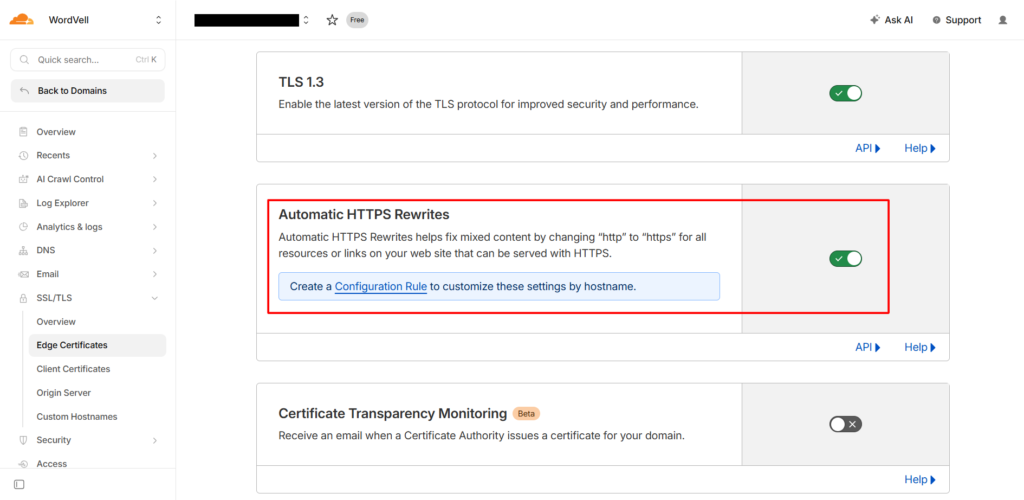
Now go to SSL/TLS → Edge Certificates and enable:
- Always Use HTTPS
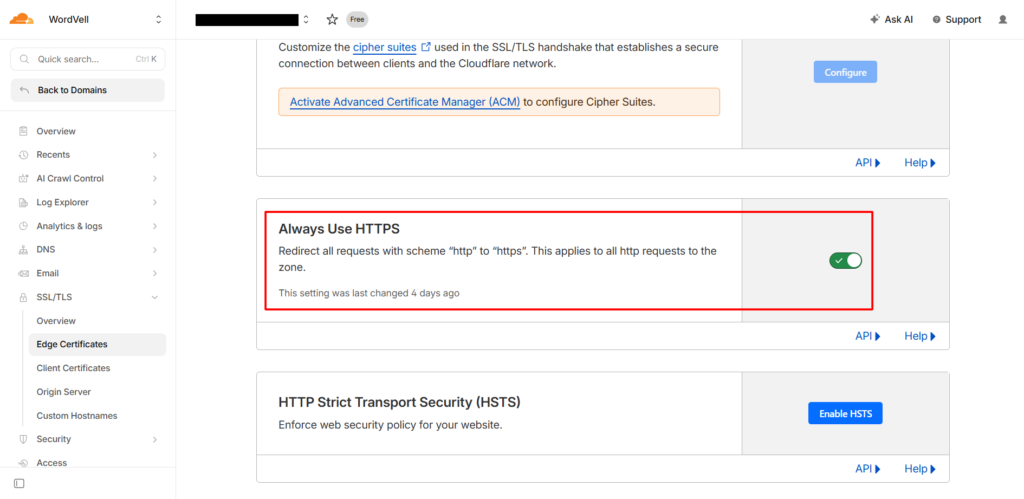
- Automatic HTTPS Rewrites
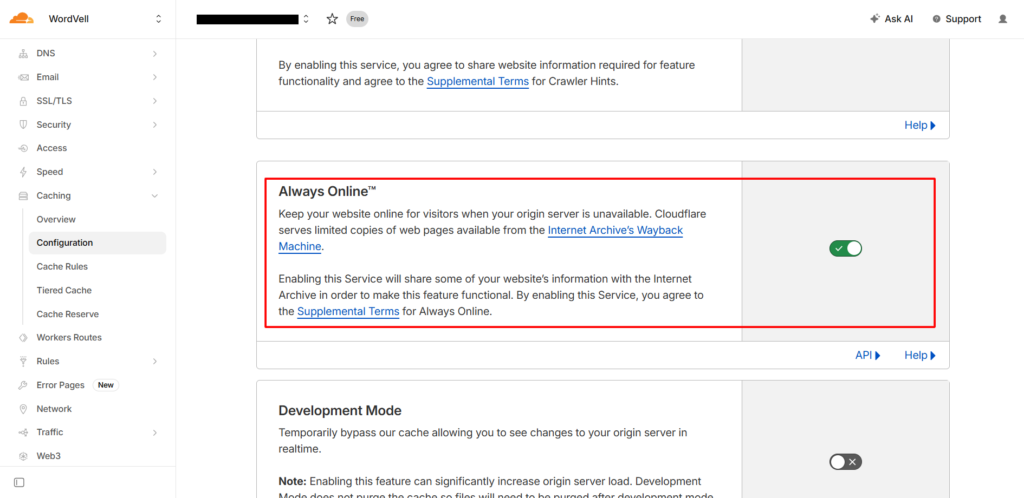
2. Caching And Availability
Open the Configuration options in the Caching tab and keep the caching level on Standard.
Set Browser Cache TTL to 4 hours, or you can change it based on how often your content updates.
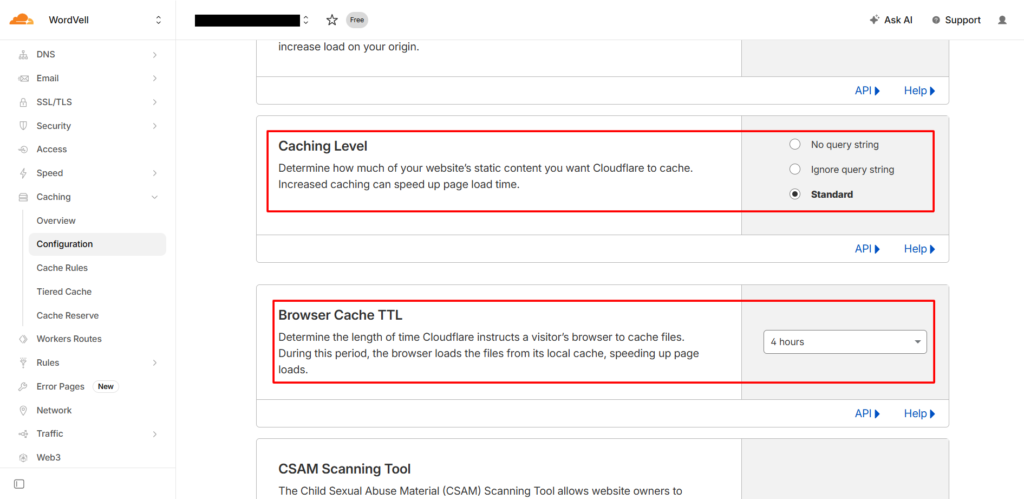
And enable Always Online if you want a fallback when your server goes down.
3. Speed Optimization (Test It After Enabling)
Go to Speed → Content Optimization and enable Rocket Loader.
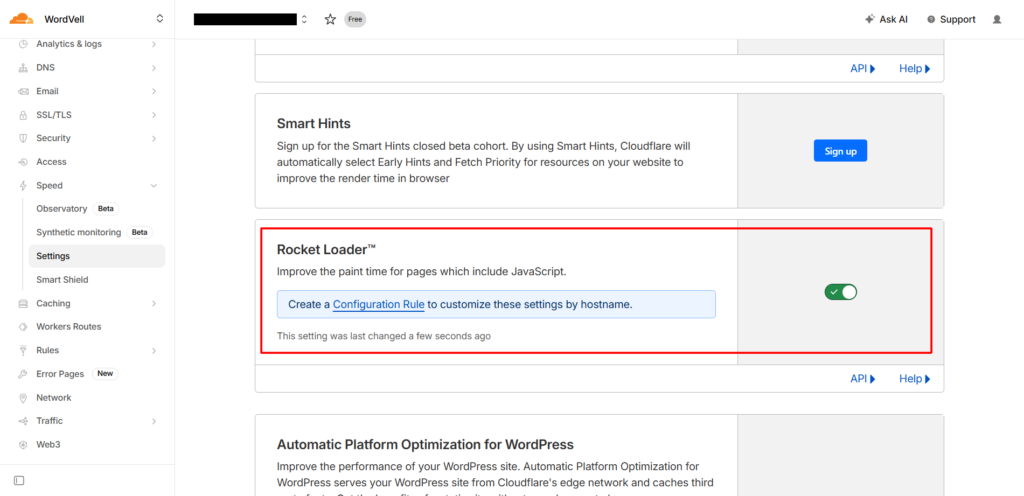
Rocket Loader can break JavaScript-heavy themes or sliders, so test your site after enabling it.
4. Bots And AI Crawler Control
Go to the Overview Tab in Domain Settings and Review bot and AI crawler settings on the right side based on your strategy.
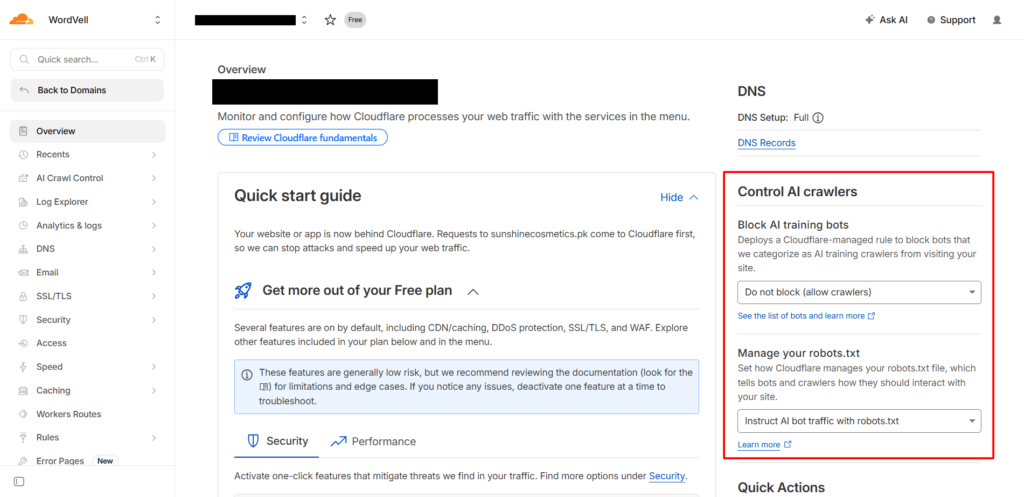
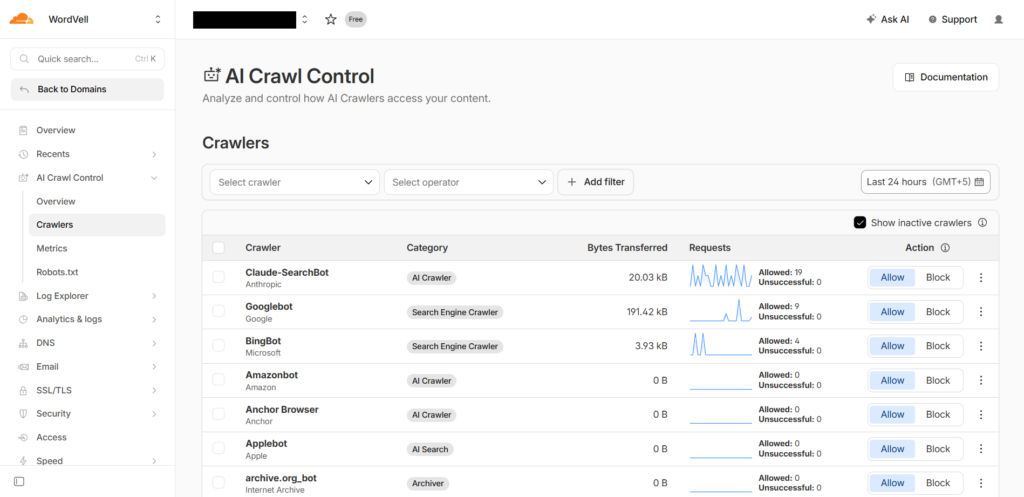
You can also do the advanced bot and AI crawler settings in the Crawlers Option under the AI Crawl Control tab.
If you want to achieve visibility in AI search and overviews, allow bots and AI crawlers on your site; otherwise, restrict them intentionally.
5. Page Rules (Free Plan Limit = 3)
To create page rules, you need to go to Rules Tab → Page Rules.
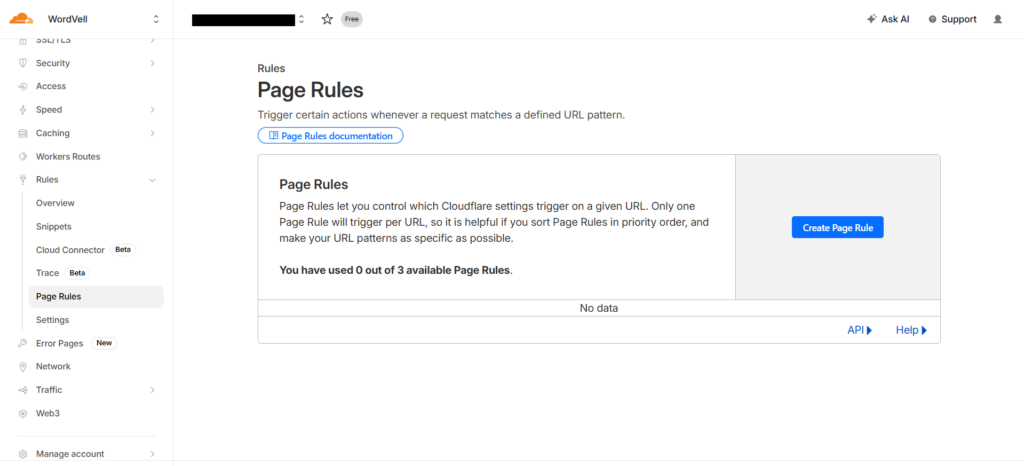
You can create these three essential rules:
- Force HTTPS across your site
- Bypass cache for /wp-admin* and /wp-login.php
- Cache front-end pages with Edge Cache TTL (if your site is mostly static)
For deeper Security, Speed, Cache, and other advanced configurations, follow the Cloudflare documentation.
Step 4: Verify Your Connection with Cloudflare
Once you’ve updated nameservers, you should take a moment to double-check that Cloudflare is fully active and routing your traffic. For verification, you can
- Check activation in Cloudflare by moving to Dashboard → Domains → Look at your domain.
- Look for confirmation status. When everything is connected, you’ll see an Active Status.
- You’ll also receive a confirmation email when the connection is done.
- If the status hasn’t updated automatically and you also don’t receive an email, then click “Check nameservers” in the Overview tab.
Verify Cloudflare Connection in Browser
You can also run a quick browser-level test to verify your Cloudflare connection. Open your site, press F12, go to the Network tab, and reload the page.
Click your domain and check the response headers for server: cloudflare.
If you see it, traffic is successfully routing through Cloudflare.
This verification method can be used to confirm the active Cloudflare proxy status.
Step 5: Install and Configure the Cloudflare Plugin in WordPress
At this point, your domain is connected.
Now, we will help you connect the Cloudflare plugin to your WordPress site, allowing Cloudflare to optimize the performance of your WordPress site.
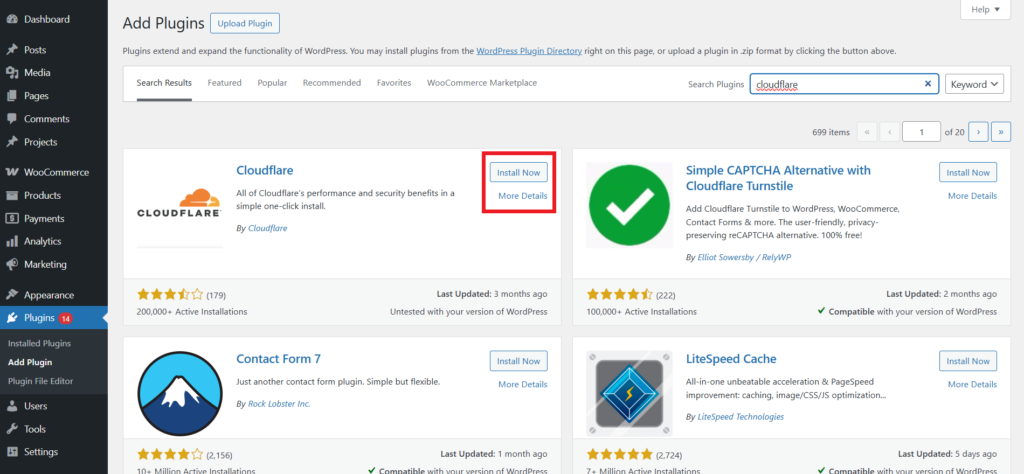
- Go to your WordPress dashboard → Plugins → Add New, search for “Cloudflare”, then install and activate it.
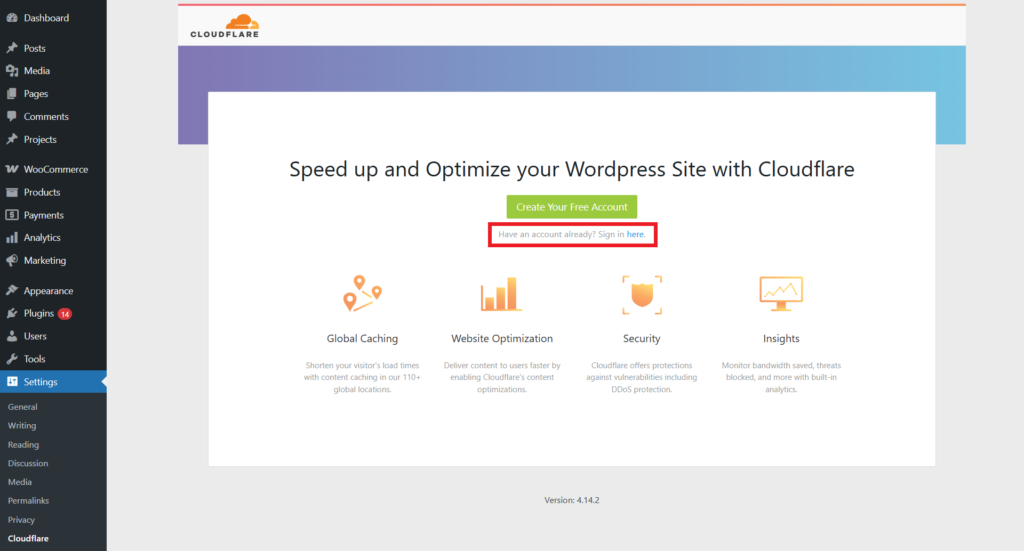
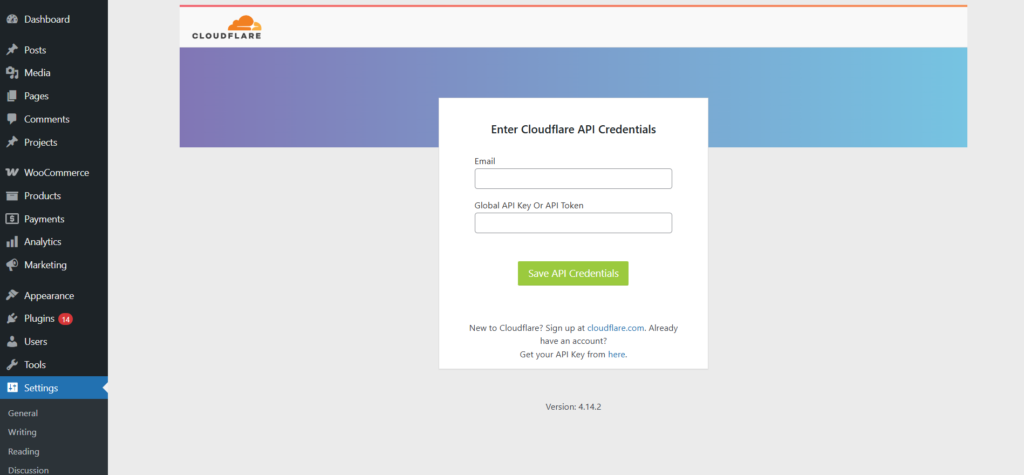
- Sign in to Cloudflare from WordPress by navigating to Settings → Cloudflare and clicking on Sign in here to start the connection.
- You’ll be asked for your Cloudflare email and an API token, so generate and add an API token.
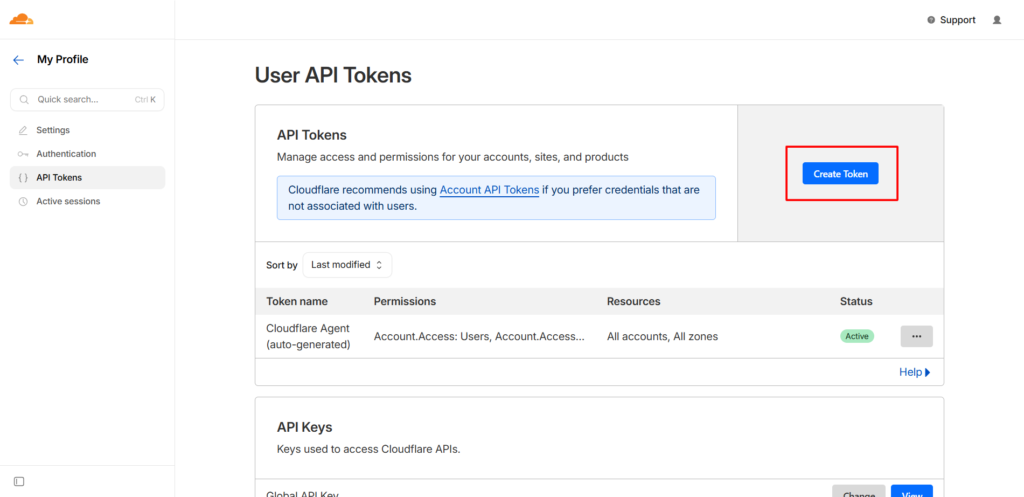
- To generate an API token, go to Cloudflare Dashboard → Profile (Click on User Icon on top right) → API Tokens, click Create Token.
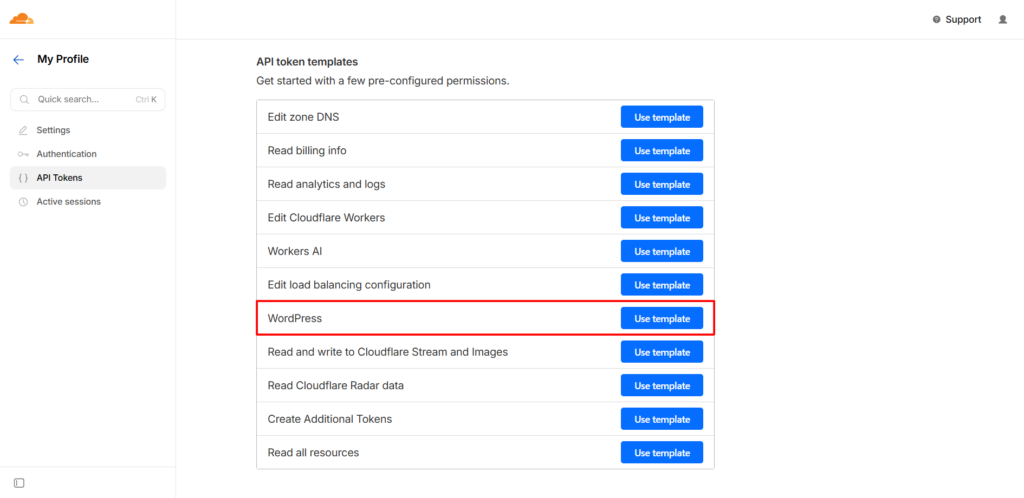
- Now, scroll down to use the WordPress template. and proceed with default permissions and settings, or configure it as per your desire. After it, click on Continue to Summary.
- Next, click on Create Token to get a token.
- Copy the generated token and paste it into the plugin, then complete the login.
- Once connected, you can control key Cloudflare features directly from your WordPress dashboard without switching tabs.
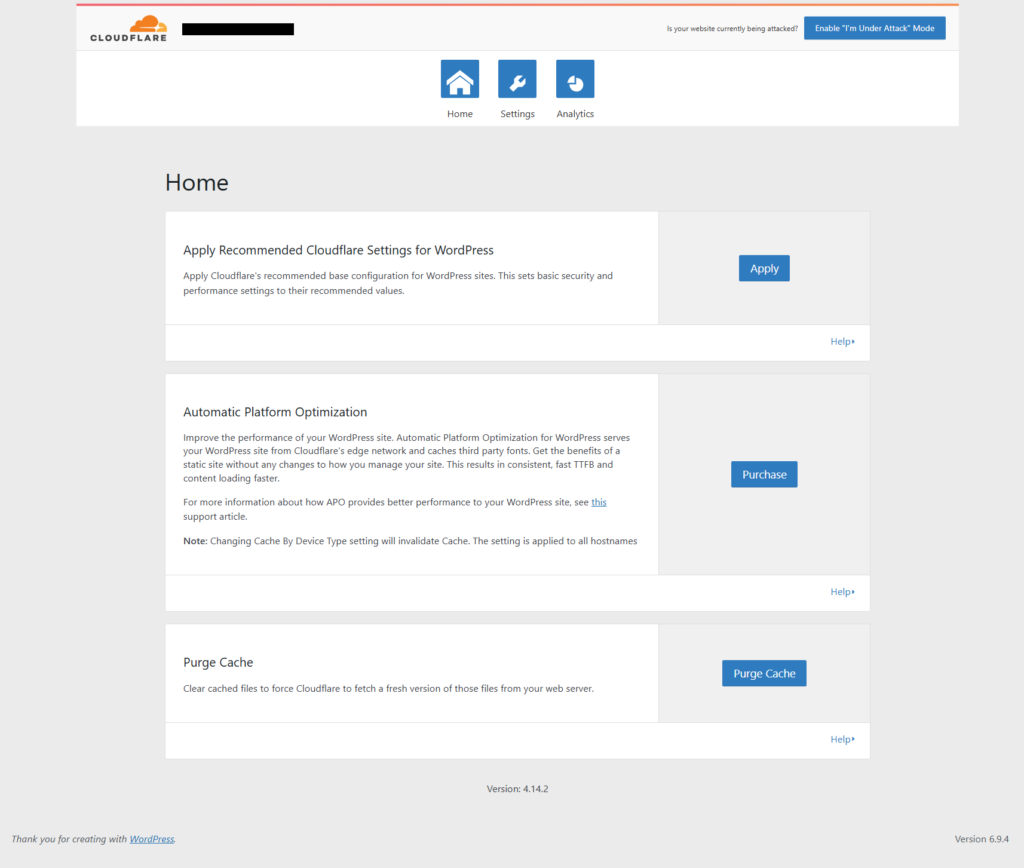
- Click on the Apply button for “Apply Recommended Cloudflare Settings for WordPress”, which handles common optimizations for WordPress automatically.
Main Features Available in the Cloudflare Plugin
- Recommended settings for WordPress: Applies optimized defaults for performance and security without manual tuning.
- Automatic Platform Optimization (APO): Caches both static and dynamic WordPress content at the edge, improving load times beyond traditional CDN behavior.
- Purge cache: Clears outdated content so users always see the latest version after updates.
- Speed and security controls: Manage Development Mode, security levels, and HTTPS rewrites directly.
- Analytics: View traffic patterns, cache performance, and blocked threats without leaving WordPress.
Post-Deploy: Essential Checks, Monitoring & Rollback Plan
Even after the site is live, it’s worth monitoring it for a bit to catch any configuration issues that might pop up. To prevent this, you can:
- Test core functionality: Check forms, login, and payments carefully, especially checkout flows if you run WooCommerce or similar setups.
- Verify email delivery: Send and receive test emails to confirm your MX records are working correctly after DNS changes.
- Monitor analytics for anomalies: Open Cloudflare Analytics and watch traffic, cache rate, and blocked requests during the first 24–48 hours.
- Keep a rollback plan ready: If something breaks, either switch back to your original nameservers or disable proxy (grey cloud) for affected subdomains.
- Document access and contacts: Keep login details and support contacts for your registrar, hosting provider, and Cloudflare ready for quick fixes.
Troubleshooting the Problems
Even with a clean setup, a few issues can still appear, and most of them come from small configuration mismatches.
1. Too Many Redirects
If you face a “too many redirects” error, it usually means your SSL mode is set to Flexible while your server or WordPress is already forcing HTTPS. Switch the SSL mode to Full (Strict) after installing a valid SSL certificate on your origin, and the loop will stop.
2. Email Stopped Working
If your email suddenly stops working, check your DNS records first. This happens when MX or mail-related records are set to proxied (orange cloud). Change them to DNS Only (grey cloud) so email traffic bypasses Cloudflare.
3. Broken JS Or Menus Not Working
If your site layout breaks or menus stop working, Rocket Loader is likely interfering with JavaScript. Disable Rocket Loader first, then test it again.
4. Cache Not Purging After Updates
If the cache is not clearing after updates, the plugin might not be properly connected. Recheck your API token, manually purge cache, and confirm using Cloudflare cache headers.
5. Nameserver Update Taking Too Long
If nameserver updates take longer than expected, verify entries at your registrar and wait, as propagation can take up to 24–48 hours in some cases.
Conclusion
At this point, you’ve connected your site with Cloudflare. You’ve set up a system that improves your site’s speed, adds a security layer to it, and reduces load on your server without complicating your workflow.
We began with setting up the Cloudflare account, then moved on to DNS and name server connection, configured SSL and performance settings, verified the connection, and finally connected everything to WordPress using the official plugin.
Following this process will help you to prevent typical headaches like SSL conflicts, caching stagnation, and email breakage.
We regularly share practical and tested solutions like this, including AI automation strategies, and real use cases for WordPress developers and agencies.
If that’s your space, subscribe to our newsletter and stay updated.
FAQ
Will Cloudflare break my email?
Cloudflare won’t break your email if you keep MX and related records set to DNS Only, so they bypass the proxy.
Does Cloudflare require a paid plan for security?
You don’t need a paid plan to get solid protection, since the free plan already includes SSL, CDN, and basic WAF rules, though advanced controls and APO come at a cost.
How long before the site speeds up?
Speed improvements usually start as soon as Cloudflare begins serving traffic, especially with caching enabled, but full impact depends on DNS propagation, which can take up to 24–48 hours in some cases.